(c) IWM Q3999
One of the most famous and dramatic landmarks on the Somme battlefield is the Lochnagar mine crater near the village of La Boisselle. The yawning chasm is the result of a massive explosion at the opening of the battle at 7.28 a.m. on 1st July 1916. This article tells you how and why it was blown, who dug it, what effect it had on the Germans, and whether it helped the attack.
The Glory Hole
Underground warfare began in the La Boisselle sector on Christmas Day 1914. The purpose of blowing a mine beneath an enemy position was to destroy a section of the defences but mostly the tunnels were stopped beneath no man’s land by counter mines. By the time the British took over the sector from French troops, no man’s land was riddled with mine galleries below ground and the surface was a mass of large craters, as both sides fought to destroy their opponents galleries by detonating ever larger explosive charges.[1]

The front line of the German 111th Reserve Infantry Regiment at the ‘Glory Hole’, called by the Germans the Granathof Stellung, 1915-16. ‘Tr’ represents mine craters in no man’s land. (c) Ralph Whitehead.
The specialist British 179th Tunnelling Company of the Royal Engineers arrived in the sector in August 1915 and found the Germans dominant, with deeper and more extensive tunnel networks. There followed a desperate struggle for control of the ground beneath no man’s land and the sector became so riven by mine craters that the British troops named it the ‘Glory Hole’. By October, when 185th Tunnelling Company was brought in to work alongside 179th, they had dug down to the water level at around 100 feet but the Germans were even deeper.[2]

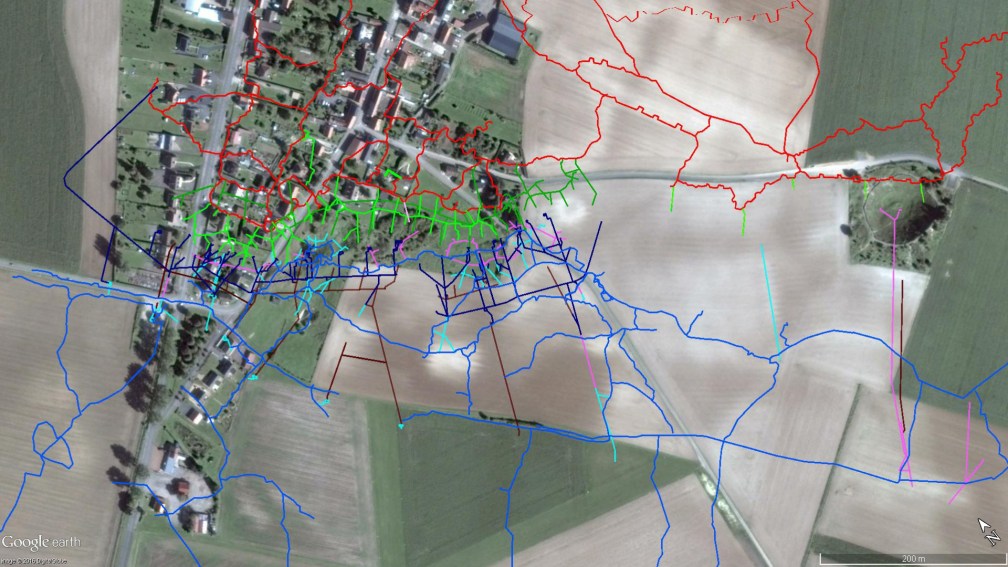
British and German mine systems at La Boisselle. (c) GoogleEarth and Simon Jones
Neither the French nor the British had managed to place a tunnel beneath the enemy front line, but the Germans had achieved it several times, destroying trenches and dugouts and burying alive infantry and engineers. The Germans had established ascendancy beneath no man’s land on the Western Front and the British response was to form specialist Tunnelling Companies of experienced miners. The officers were mostly mining engineers and 185th was commanded by Captain Thomas Richardson who, a few months previously, had been in charge of sewerage construction in Rio de Janeiro.

Thomas Richardson, first commander of 185th Tunnelling Company.
The Genesis of the Lochnagar Mine
On 11th November 1915, in a new attempt to reach the German trenches, Richardson began a new tunnel away from any known German mining. To conceal the entrance from German view, he began it 400 feet behind his own front line, at a communication trench called Lochnagar Street, but to reach the German lines it would need to be driven almost a thousand feet.
To further conceal the workings and protect them from shell and mortar fire, Richardson first sank a vertical shaft 30 feet and excavated a chamber; from here he began what was described as a ‘main attack gallery’ at a steep 45 degree incline. To remove the spoil, he drove another gallery sloping gently back from the chamber to a point over 100 feet behind. By the end of the month they had driven the attack gallery 115 feet which, if it maintained a 45 degree incline, will have reached 110 feet depth. They had also begun a second gallery at 45 feet depth, running towards the German line on a horizontally plane which had reached 54 feet in length. The miners advanced the tunnels by up to 17 feet a day but the speed of work caused problems for the infantry having to remove the spoil. For every foot dug about 48 sandbags of spoil had to be removed and in early December they lay a trolley way to facilitate their removal.[3] Richardson also began a third gallery towards the Germans by branching from the main attack gallery at 90 feet depth; like the 45 feet gallery, this was horizontal rather than inclined.

Joe Cox and Tom Hodgetts, miners from Shirebrook, Derbyshire, serving with 185th Tunnelling Company photographed on the Somme in Albert. Friends from before the war, only Tom survived. (c) Duncan Hunting
At the deeper levels, the chalk was extremely hard and the engineering contractor who had recruited the Tunnelling Companies, John Norton-Griffiths, advocated using pneumatic picks to drive tunnels through it at the water level, between 80 and 120 feet deep, to attack the Germans.[4] Richardson, however, did not to use a compressor to drill the Lochnagar tunnels mechanically, although one was installed at the far more extensive Inch Street system in the Glory Hole. Compressed air driven rotary drills were not a success and stuck in small pockets of soft chalk,[5] while hammer drills could be heard for long distances underground, alerting the enemy to the activity. The alternative however was also noisy, as it involved shot blasting with explosives from 1½-inch diameter holes hand-drilled into the face. The reverberation of the denotations were clearly heard and felt for long distances underground, but Richardson and his German opponents adopted shot blasting as the only means of making progress. Captain Henry Hance, who commanded 179th Tunnelling Company, disliked this method because he believed it would provoke the enemy and alert them to the British work, but he also had no choice but to adopt it.
Sometime in January 1916 Richardson ceased driving the main attack gallery, possibly because it was well below the water level and will have needed constant pumping. He continued the 45 feet and 90 feet deep horizontal galleries and, because the ground rose towards the German lines, their depths slowly increased to 50 and 100 feet. Richardson’s reasons for driving galleries at different levels are not fully clear but they enabled him to listen more effectively for German counter mines and also enabled him to mask the noise from his deeper gallery with deliberately noisy work at the upper level.[6]

A British tunnel at 80 feet depth in the hard chalk at La Boisselle explored in 2013. (Iain McHenry/La Boisselle Study Group)
German Suspicions: Silent Working
The spoil heap from the Lochnagar workings quickly grew to ‘a colossal mountain of white chalk burrowed from the bowels of the earth.’[7] The Germans could see it from aerial photographs and probably also from their own lines and began to shell it regularly. Early on the 30th January, the Germans launched a raid on the British front line south of the Lochnagar mine, capturing a dozen men of the Essex Regiment but failed to reach the mine entrance. [8] It was a lucky escape but shortly afterwards, a disaster was to befall 185th. On 4th February, while Richardson was experimenting with a listening apparatus in the Inch Street system, the Germans blew a mine charge close to a British gallery. Methane from the explosion was forced into the British system and detonated, badly injuring Richardson and another officer; the resulting vacuum drew in carbon monoxide, also a by-product of the original explosion, which killed the two officers and sixteen miners.
Three weeks later, 185th Tunnelling Company was ordered to a new sector to the north and Hance’s 179th took over its underground workings. By this time, the upper Lochnagar gallery was advanced almost 800 feet, the lower 535 feet. Hance halted work on the deeper gallery and just continued the upper, which was now less than 200 feet from the German front line. The danger of detection was now extremely real. They halted work frequently to listen for sounds of German countermining, often for long periods, and on 8th March no sounds were audible to the naked ear for 24 hours. By the end that month, the face of the Lochnagar tunnel was about 140 feet from the Germans and 179th had to try to work in complete silence if the Germans were not to detect them. The hand-pushed spoil trucks were too noisy, even though they were fitted with rubber tyres and ran on wooden rails and, as one of the officers, James Young, recalled, ‘at the end everything was man-handled.’[9] Lieutenant Stanley Bullock described the ground as ‘broken chalk’, which meant that it was possible to get a bayonet point into cracks in the face, and Hance described the methods used to avoid being heard:
It was done in silence. A large number of bayonets were fitted with handles. The operator inserted the point in a crack in the “face”, or alongside a flint, of which there were any number in the chalk, gave it a twist which wrenched loose a piece of stone of varying size which he caught with his other hand and laid on the floor. If, for any reason, he had to use greater force, another man from behind would catch the stone as it fell. The men worked bare-footed, the floor of the gallery was carpeted with sandbags, and an officer was always present to preserve silence. As sand bags were filled with chalk they were passed out along a line of men seated on the floor, and stacked against the wall ready for use later as tamping.[10]

Henry M. Hance, commander of 179th Tunnelling Company, photographed before the war. (c) Mr. J. Bennett and Simon Jones.
To ventilate the long drive they used large blacksmiths bellows connected to hose which ran up to the working face but the air was still so poor that candles would only burn at the face directly where the air came out of the hose.[11] They reduced the size of the gallery to about four and a half feet high and two and a half feet wide, leaving less to excavate, but conditions were even more uncomfortable. Hance recalled:
The work was extremely laborious, and if we advanced 18” in 24 hours we thought we did well.[12]
In fact, average progress during March fell to less than one foot a day.[13]
In the Inch Street system, the galleries of both sides were so close beneath no man’s land that a break-in, described by Bullock as ‘one of the things we dreaded,’ was daily expected and finally occurred on 10th April 1916.[14] Captain Wilfred Creswick, in charge of the Inch Street and Lochnagar workings, entered an enemy gallery but the Germans blew a charge laid in readiness and he, with two miners working nearby, were killed and their bodies lost beyond recovery. Creswick was replaced as Section Commander by James Young, a colliery manager from Kilmarnock; he was to be responsible for the completion, charging and firing of the Lochnagar mine. The next day, the Germans raided the front line above the Lochnagar mine for a second time, capturing 29 British infantry but, again, they did not penetrate as far as the tunnel entrance. On the day of the raid, Hance was sent for extended leave to a rest centre in Marseille for reasons not recorded but probably exhaustion and he didn’t return until 7th June. Until then, 179th was under the second in command, Captain Gilbert Rowan, a colliery manager from Fife. This was to be a crucial period of preparation for the Somme offensive.

Gilbert Rowan, who commanded 179th Tunnelling Company during much of the preparation for the Battle of the Somme. (c) Fiona Middlemiss
The Lochnagar tunnel was directed at a German position known as the Schwabenhöhe from which the Germans had a wide field of fire against British attackers crossing an area known as Sausage Valley. Hance described the objective as being threefold:
(1) to destroy the enemy trench and to knock out his machine guns at this point, where his trench formed a pronounced salient (2) to destroy his underground system whatever it might be (3) to kill any troops he might have sheltering underground from our bombardment.[15]
In mid-April, 179th branched the tunnel to aim at two points on the German front line with the intention of placing two mines, 250 feet apart but, as the branches were slowly advanced, they began to hear the sounds of Germans overhead, digging down from their front line. The German mining operations were carried out by Württemberg troops of the 1st Reserve Company of the 13th Pioneers, commanded by Lieutenant Sihler. Sihler must have suspected British activity because in April he started two underground listening galleries from the Schwabenhöhe; on 22nd reported that noises had been heard in front of the southern part and began three more tunnels to try to locate the source. By the end of the month, the two closest to the British tunnel were about 130 feet away but, although the southernmost was kinked slightly towards the British tunnel, they continued otherwise straight suggesting that Sihler had not pinpointed its location. By mid-June Sihler’s two galleries closest to the Lochnagar tunnel were both down over 80 feet (27m and 26m), almost twice as deep as the British.[16] ‘Jerry was very close and under us,’ Young recalled and, as they worked silently in the Lochnagar tunnel, the British miners could hear the Germans plainly with the naked ear, in a gallery descending from their front line, ‘stumping down their incline’ and also clearly above in dugouts.[17] But the sounds didn’t get any closer: Sihler knew they were somewhere but didn’t know exactly where.
The Coming Somme Attack
During April and May Rowan had to deal with increasing demands on his men for the coming Somme offensive. The 179th was engaged in a second major mine gallery on the left side of La Boisselle village, aimed at a German position known as Y Sap, which was to be even longer than the Lochnagar tunnel. Rowan was also ordered to dig a series of shallow tunnels across no man’s land, known as ‘Russian Saps’, not only at La Boisselle but opposite Ovillers and Thiepval to the north, intended as mortar or machine gun positions and to enable re-supply once the German front line had been captured. One, known as Kerriemuir, was started in April about 400 feet to the left of the Lochnagar mine. Rowan had to withdraw a quarter of his personnel from the tunnel system at the Glory Hole to work on the Russian Saps and the blowing of mines in the Glory Hole was stopped unless absolutely necessary.[18] Hugh Kerr, in charge of the Y Sap tunnel, paid tribute to the men of 179th:
The men worked like hell – you never saw such workmen in your life. They went all out. We had over 900 strong at one time; had about 600 or 700 infantry attached humping sandbags out of the place.[19]

Hugh Kerr, responsible for the Y Sap mine which he fired on 1 July 1916. (Daily Mirror 25 May 1917)
On 15th May Rowan attended a meeting at III Corps headquarters at which the coming attack was explained: ten days later he suffered a reoccurrence of a gastric ulcer. It was only in mid-June, when the commander of Fourth Army, General Rawlinson, issued orders for the attack, that the rest of the 179th were definitely informed of it. The strain of the work also told on the men and during late May and June some miners were demoted from six shilling a day ‘Tunnellers’ to two shillings and two pence ‘Tunneller’s Mates’ for ‘inefficiency’ or ‘laziness’, a major blow to the pride of a miner who could earn far more at home. On 19th June, a Sergeant deserted but was later allowed to continue serving in the ranks.
The Y Sap mine reached its target beneath the German position, at the cost of sacrificing quiet working, but progress at Lochnagar was so slow that time was running out. When the 4th Army Operation Order was issued on 14th June, neither of the two Lochnagar branches tunnels had reached beneath the German line, both were well over a hundred feet short. Hance stopped driving the two tunnels forward and began cutting out chambers to contain explosives. To compensate, he would have to ‘overcharge’ the mines with far more explosive than was needed simply to form a crater, in order to throw the maximum amount of debris over the German trenches: rather than blow the defenders skywards, they would bury them alive. The overcharging would also to throw up high lips of debris which might form a barrier to prevent the Germans firing from the flanks, especially from the village of La Boisselle across no man’s land, and also create high ground from which the attackers could gain observation and fire over the Germans. But this depended on the attackers reaching the high lips before the Germans and previous experience showed that the Germans were faster than the British at capturing crater lips, even when taken by surprise.
The plan by the 34th Division to capture the heavily fortified La Boisselle relied on a converging attack which would envelop the village. Rather than helping this attack, the mines risked disrupting it, for the attacking infantry would have to pass either side of the Lochnagar and Y Sap mines, leaving gaps in the advance. The battalion on whose left front the Lochnagar mine was to be detonated, the 10th Lincolns (Grimsby Chums), had to delay their advance because of the need to withdraw from their front line owing to the danger of their trenches collapsing and the perceived danger of falling debris. No man’s land was wider to the right of the mine and this meant that they had to cross an even wider expanse. When the commander of the brigade which was to make the attack at this point (Brigadier-General R. C. Gore, 101st Infantry Brigade) briefed his battalion commanders on the coming operation, one, Lt. Col. Urmiston, 15th Royal Scots, objected that the mine would delay the advance and leave his men vulnerable to machine gun fire coming from his left when the German machine gunners would be able to focus entirely on his battalion. He offered to change places with the Lincolns, closest to the mine, and take the risk from the debris, if it meant that all the units could advance simultaneously. According to Urmiston, his offer was declined by his brigade commander who felt unable to alter decisions already taken by the higher command.[20]
The timing of the mines blown on 1st July 1916 became controversial when that at Beaumont Hamel was detonated ten minutes before Zero.[21] This fatal error not only gave the Germans the perfect warning that the attack had finally come but also disrupted the timings of the crucial barrage lifts in the whole sector, denying the attacking infantry the protection of their own guns so that troops could try to seize the crater in advance of the main attack. This was not proposed at La Boisselle where initially the Lochnagar mine was ordered to be fired at one minute before Zero and the Y Sap Mine at Zero. Within a few days orders were amended so that Lochnagar was to be blown two minutes before Zero, then both mines were to be blown at this time.[22] This was probably prompted by caution over the attackers being injured by falling debris and the danger of a slight delay in the mines firing. Two minutes were in fact more than adequate for the debris to fall but it required precise coordination of the firing of the mine and the advance by the infantry. The infantry were eager to get across no man’s land as soon as their barrage moved on to the next line of defences, before the Germans could open fire, but the mining officer in the trenches had to fire the mine exactly to synchronise with the artillery barrage and the infantry attack. The decision as to the timing will not have been Hance’s although he may have been consulted and will have had a view. He had been awarded the Military Cross for charging and firing a mine on 15th June 1915 at Givenchy, which had killed a Canadian officer and buried other attackers. As with Lochnagar, it was overcharged because it had not reached as far as the German line and was also blown two minutes before zero.[23]

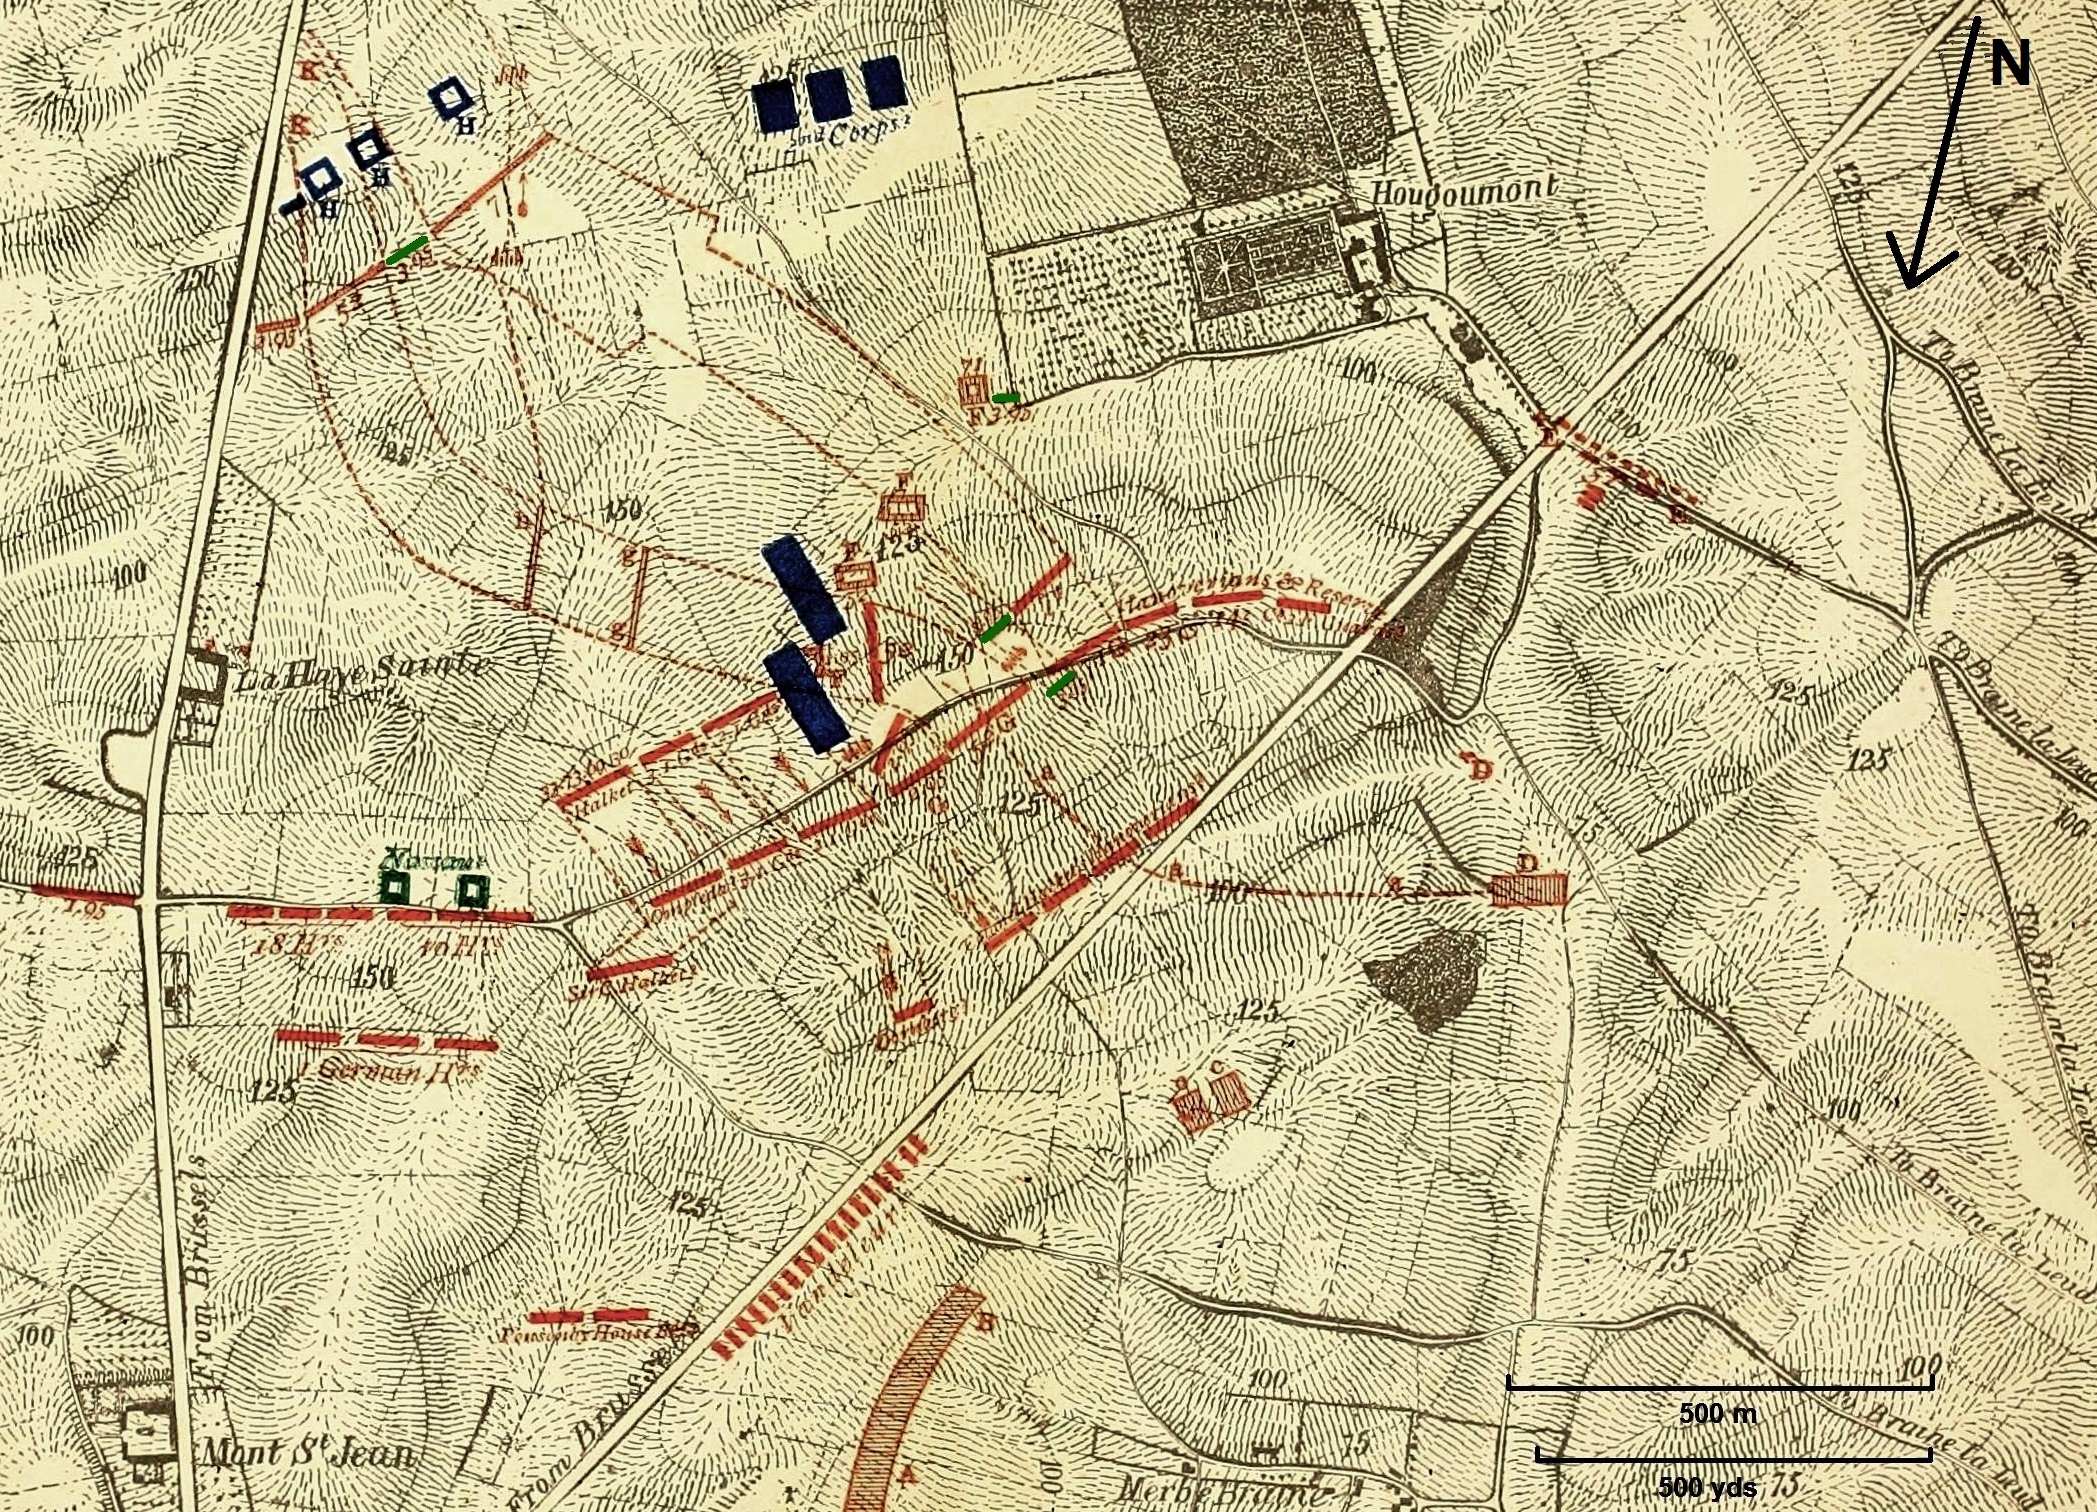
Aerial photograph with British and German mining south of the Glory Hole prior to Zero on 1st July 1916. (c) Landesarchiv Baden Württemberg/ Annotations (C) Simon Jones.
Charging the Mine
As Hance calculated the quantity of explosives needed at Lochnagar and Y Sap he will have known of no one else in history who had created such large explosions. He would place 40,000 pounds (18.1 tonnes) at Y Sap and two charges of 30,000 pounds (13.6 tonnes) at Lochnagar. The left branch at Lochnagar was roughly at ninety degrees to the German trench while the longer right branch approached it at about forty-five. Therefore he divided the charges unevenly, placing 24,000 pounds in the left branch and 36,000 in the longer right branch. The two chambers were not large enough for the charges which would overflow into the branch galleries back to the junction and the charges would form one massive crater. The combined 60,000 pounds (27.2 tonnes) would therefore give 179th Tunnelling Company the record for the largest mine yet blown by the British.[24] At the same time 179th would fire two 8,000 pound ‘camouflet’ charges in the Inch Street system to destroy the German galleries, this meant that a total of 116,000 pounds (52.6 tonnes) had to be carried into the front line and down the long tunnels.
Since 5th June, 179th had known that the attack would be preceded by five days of preparatory bombardment and gas attacks, during which time the trenches were to be kept as empty as possible. As well as the danger of some of the British shells falling short, the Germans were very likely to respond with counter shelling and they needed to complete charging before this began, although the date was yet to be announced. Bullock described how the explosive for the Lochnagar mine and the two camouflets was brought up by night in horse drawn wagons to a chateau just behind the lines at Bécourt, which also housed a medical unit and Brigade headquarters:
much to the anxiety of the Brigade Major, who certainly had reason for his fears since, should this have been exploded, which was quite likely considering that the Germans were frequently bombarding this place, he and his staff and the dressing station would all have gone sky high.[25]
Every night for about a week, infantry parties carried over one and a half thousand boxes, each containing 50 pounds of the ammonal explosive, up to the mine entrances:
I or one of the other Tunnelling Officers had always to meet these parties in order to see that the work was duly carried out and at the same time guide them through the trenches. As may be imagined, this was not a task particularly enjoyed by those concerned, as, not only was it very heavy work, as the trenches at that time were wet and greasy, but the job of carrying explosive about with the likelihood of shells dropping amongst you was not a particularly desirable one. By the time the Infantry had been on this work for two or three nights the general impression amongst them was that we were getting up enough explosive to blow Fritz back to Berlin.[26]
The boxes were about a foot square and, according to one of the Grimsby Chums, each infantrymen had to take up two:
… we carried ammonal up to the mouth of a mine-shaft, in square wooden boxes, each containing 50 lb., two being nailed together with narrow strips of wood which served as handles. On the first night we were in a trench behind the château, awaiting the order to move off, when we were startled by a shower of 5.9’s, and a near-stampede followed. Fortunately, those in front moved off briskly, and those behind lost no time in following. The boxes were delivered in record time![27]
During the day they decanted the ammonal explosive into rubberized canvas bags to keep it dry during the two weeks that it would lie in the chamber. Each bag contained about thirty pounds and for the Lochnagar charges they filled 2,000 bags. One tunneller described decanting as:
a dangerous and unpleasant job, the ammonal dust staining everything it came in contact with, including arms and faces, a violent and lasting yellow.[28]
The charging of Lochnagar was begun by Captain James Young and Lieutenant Ralph Fox and they expected to get the job about half complete before they were relieved after 48 hours. They did not use the wheeled trolleys for fear of alerting the Germans and the quantity of men needed soon ate up all the available oxygen in the cramped, 900 foot tunnel. When Bullock and Second Lieutenant Alexander McKay took over, they found only about twenty bags loaded. Rather than trying to carry the bags down the tunnel, they organised the men as a human chain along the entire length, while the officers took it in turn to stack the bags in the chambers and branch galleries:
We determined to get along with the thing as quickly as possible and took eight hour spells in the face each with periodical trips up and down the gallery in order to keep the Infantry passing bags from one to another at full speed. This could only be done by having the men spaced every two yards, thus curtailing the distance each man had to carry.[29]

In this staged photograph, a Tunnelling officer demonstrates a geophone listening device while the miners appear to be putting in tamping for a mine charge. In reality, the geophone was too sensitive to be used when men were working in the vicinity. (C) IWM Q115
All the time they were conscious of the Germans above and below but, so long as they could hear them, they knew that they were not going to blow. The German routine was to stop work between midnight and 7am: it was during this silent period that there was the greatest risk of being blown but 179th could not stop work. By 7am they had loaded about 400 bags and anxiously waited for the Germans to resume: instead there was a further silence that Bullock found ominous and terrifying:
we all thought that the Boche must have tumbled to what we were doing, and we half expected to have the whole thing blown up any minute, the only consolation being that we should not know what had happened.[30]
Finally, after an hour, the Germans started work as normal; Bullock never understood the reason for the delay. Later that morning they had half the charge loaded and the detonators and leads prepared for embedding in the charges. Both charges at Lochnagar required twelve detonators, connected in series, each inserted into a guncotton primer, which were placed inside charge bags and buried evenly throughout the explosives, plus a complete back-up system of another twelve detonators in case the first failed. It was the most dangerous part of the work, carried out by the officers in the chambers, surrounded by hundred of stacked bags of explosives. Bullock and McKay had all the detonators in, the leads connected and the two chambers about three-quarters charged when Young came up that afternoon to take over. He expected to check that the detonators were in correctly and the leads properly connected, but Bullock and McKay had worked much faster than he anticipated – one senses rivalry between the shifts and the officers – and Young had no choice but to report to Hance that everything was in order. By the following morning they had completed the charging and begun backfilling, or tamping, the tunnel. They had stored hundreds of sandbags of chalk along the gallery in readiness and used them to block the tunnel solidly for 350 feet from the branch.
Zero
On 23rd June Fourth Army ordered that the bombardment should begin the following day, this would make Zero day the 29th. On the afternoon of 28th June, six officers detailed by Hance to fire the four mines went to the headquarters of 34th Division for their final instructions for the attack the following day. The firing of Lochnagar was the task of James Young and Second Lieutenant Ralph Fox, Stanley Bullock and Alexander McKay would blow the two mines in Inch Street, and Y Sap was blown by Captain Hugh Kerr and Lieutenant Ralph Hawtrey. They learned that Zero Hour was to be at 7.30 a.m. and that they were to detonate the four mines two minutes before. They set their watches by one at headquarters which in turn had been synchronised with others sent to each headquarters all along the attack front. No sooner had they reached the front line, after a long journey through trenches packed with troops preparing for the attack, than they were ordered to return: Zero had been postponed for two days to 1st July. Bad weather had prevented accurate bombardment of the German positions and more shelling was needed.

Ralph Hawtrey, James Young and Stanley Bullock, 179th Tunnelling Company, in Albert on 28th June 1916, prior to leaving for the front line for the opening of the Battle of the Somme. Ralph Hawtrey was killed at High Wood in September. (c) Mrs. A. Russell and Simon Jones
When the firing party went up for the second time the German retaliation had begun: the shrapnel shells bursting in the air was ‘one of the most brilliant displays of fireworks’ that Bullock had ever seen.[31]
The firing leads were run back to dugouts close to the front line, where in the early morning, the six tunnelling officers were checking and re-checking the firing circuits by passing through a low current from a battery to flick the needle of a galvanometer. Even though they had used twin sets of leads for each mine, sudden shelling could cause a breakage that might be impossible to find and repair. All the effort would have been wasted and the attackers would lose the advantage that the mines promised. At 6.25 a.m., the British bombardment resumed with a fierce new intensity.
The infantrymen who were to attack near to the two mines had been warned to stay out of any unsupported dugouts, to beware of falling debris and to expect craters 150 yards across. A whole section of the British front line which jutted out immediately to the right of where Lochnagar was to explode was evacuated by the 10th Lincolns (Grimsby Chums) owing to the danger. To the left, in the Tyneside Scottish someone in the first wave shouted to his men five minutes before Zero, ‘NOW! Get hold of the parapet boys, she’s going up’.[32]
Opposite, mostly deep in their dugouts and the cellars of La Boisselle, men from Baden of the 110th Reserve Infantry Regiment had endured a week of torment from explosions, thirst and hunger. But in most places, although their trenches were in ruins, the dugouts held up against the British shells and only to the south of the Schwabenhöhe had heavy mortars caused some to collapse.
At 7.28 a.m. Stanley Bullock rammed down the handle of his exploder to fire the first of the Inch Street mines. After the merest pause, he felt the ground beneath him shudder, a few seconds later another shake of the ground told him that Young had successfully fired Lochnagar:
In the suspense which ensued before I felt the next mine explode, there was no thought for the destruction of life and waste of material when thousands of tons of explosives disappeared into space, only that orders should be faithfully obeyed.[33]
McKay then pressed his plunger home; they did not notice the Y Sap mine go up but Kerr fired it successfully. On the ground, the shockwaves of the mines were felt far more than heard, there was no bang, either on the Somme or in England as was claimed much later;[34] but 8,000 feet above the battlefield the sound waves reached a pilot who had been warned to keep clear of La Boisselle but turned his machine to observe the detonations of Lochnagar and Y Sap:
… the earth heaved and flashed, a tremendous and magnificent column rose up into the sky. There was an ear-splitting roar, drowning all the guns, flinging the machine sideways in the repercussing air. The earthy column rose, higher and higher to almost four thousand feet. There it hung, or seemed to hang, for a moment in the air, like the silhouette of some great cypress tree, then fell away in a widening cone of dust and debris. A moment later came the second mine. Again the roar, the upflung machine, the strange gaunt silhouette invading the sky. Then the dust cleared and we saw the two white eyes of the craters.[35]
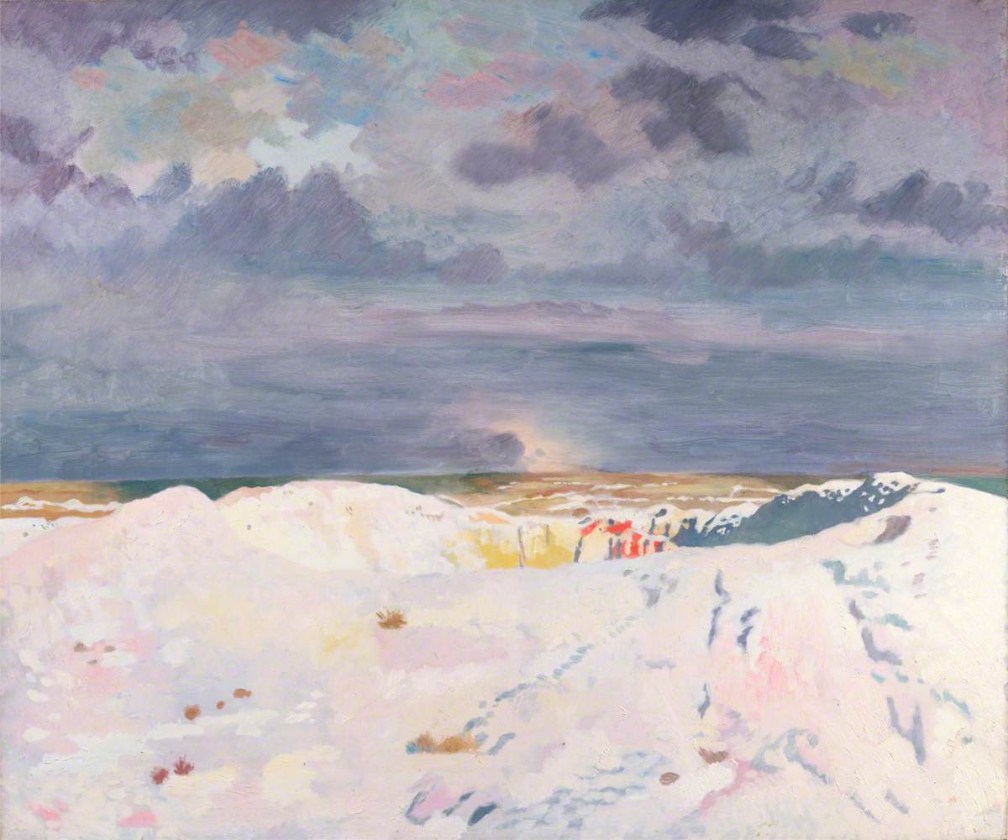
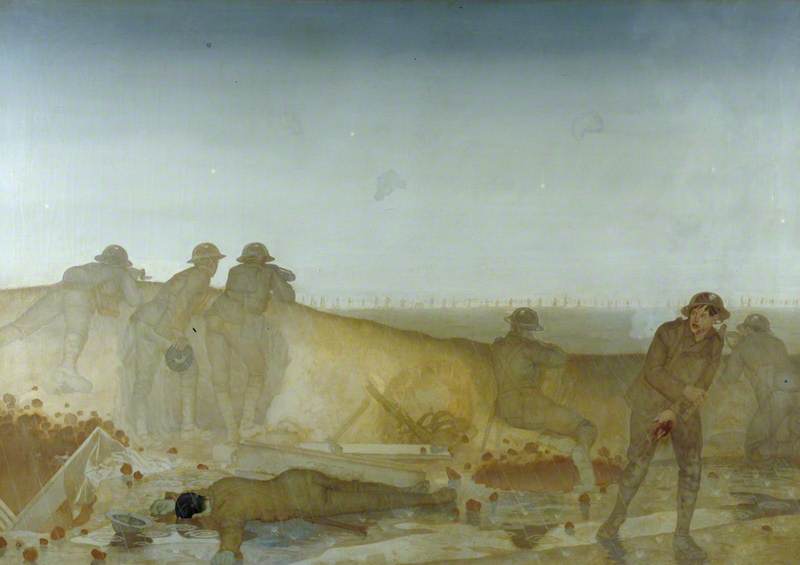
‘The Great Mine, La Boisselle’, the Lochnagar Mine depicted by the artist William Orpen in 1917. © IWM (Art.IWM ART 2379)
An officer of the 3rd Tyneside Scottish, in the second wave to the left of the Lochnagar mine, was exalted:
…we witnessed a most wonderful spectacle. A huge column of chalk was thrown up several hundred feet into the air and came down in a beautiful white cascade. [36]
One of the Grimsby Chums described ‘the whole ground around swaying and rocking as with an earthquake’ and another, who braced his leg against the trench, had it broken by the shock wave.[37] They felt the ground sway three times and saw a crust of earth rise and bursting from it a core of amber:
great pieces of earth as big as coal wagons were blasted skywards to hurtle and roll and then start to scream back all around us. A great geyser of mud, chalk and flame had risen and subsided before our gaze.[38]
Another likened the swaying of the ground to the plate of a weighing machine:
Looking over the parapet, one saw a huge wall rise to some three hundred feet, composed of chalk, mud, dust, timber, etc., with here and there a German. [39]

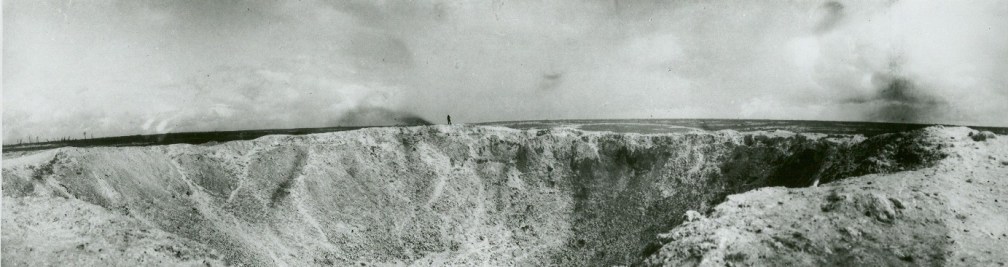
The Lochnagar crater, shortly after it was blown, showing the location of the two charges. From The Work of the Royal Engineers in the European War, 1914-19. Military Mining (Chatham, 1922).
The Lochnagar mine hurled up 84,000 tonnes of earth and chalk and left a crater 220 feet across and 55 feet deep.[40] The debris buried 600 feet of the German front line and the Baden infantry in the dugouts had no chance: some were instantly fragmented, some hurled into the air, crushed, or would die slowly trapped 30 feet underground. At Y Sap the mine completely destroyed the German advanced position, leaving a high-lipped crater 130 feet wide but, having detected the British digging beneath them, the Germans had withdrawn back to their front line and suffered no casualties.
Two minutes after the mines detonated came Zero. As the British guns lifted their fire from the German front line to the positions behind, 4,000 heavily burdened British soldiers climbed out of their trenches and began walking across the overgrown fields of no man’s land while, behind them, another 4,000 surged forward. Soon more would advance, for the commander of the 34th Division had deployed all his 12,000 infantry at once against La Boisselle.
Apart from around the Lochnagar mine and in places south of the Schwabenhöhe, the deep German dugouts had withstood the British bombardment. The mine explosions and the lifting of the British barrage alerted the Baden infantrymen that the long-expected attack had arrived. The survivors emerged from dugouts with machine guns and rifles to open fire on the rows of soldiers advancing in orderly lines through the long grass and sweeping down the slopes behind in columns. Within two minutes of setting out, the leading attackers were struck by the German machine gun and rifle fire. Many of the Grimsby Chums and 11th Suffolks were hit before they had even passed their own front line, having been pulled back to avoid the Lochnagar mine debris. The pace of the advance was carefully regulated to keep behind the protective British barrage but as the men at the front faltered, those following caught up and the bunched men formed perfect targets. Within ten minutes eighty percent of the leading battalions were hit. The losses suffered by the 34th Division attacking at La Boisselle were the worst of any on the 1st July 1916.[41] Urmiston was correct in his prediction about heavy German fire, except that it was experienced by all the attacking battalions. However, the Lochnagar mine successfully destroyed a section of the German front line. The destruction enabled the attackers to penetrate the German front line and advance beyond it until, counterattacked, they were forced back to the area of the crater.[42] In his report on the mine, Hance claimed that the mine had benefited the attackers by causing ‘considerable loss’ to the Germans and that:
by the violence of the shock to his garrison, and the shelter afforded by the lips of the crater itself, enabled our attacking infantry to reach his trenches here, and to pass over them in the first assault, with comparatively light loss. Such loss as was incurred must have been caused by fire from his flank. The infantry were also on Z night to establish themselves inside this crater, forming an advance position in front of our original trenches.[43]

The attack of the 34th Division on 1st July 1916 (British Official History).
The Kerriemuir Russian Sap was intended to allow the re-supply of the captured front line in just such an eventuality. By the night before Zero, the 179th was supposed to have prepared the tunnel with just two feet of cover left before it broke the surface, three-quarters of the way across no man’s land. The final work of opening it immediately the mines were blown was the task of a platoon of the 18th Northumberland Fusiliers Pioneers under Lieutenant John Nixon. On the evening of 30th June, however, Nixon was shocked to learn that his men would have to dig through twelve feet of chalk to open the tunnel, a full day’s work. They therefore began the task at midnight and managed to open the Kerriemuir tunnel an hour after Zero, and it was used later in the afternoon to feed men through to reinforce the captured German line in the Schwabenhöhe (it was not, as was claimed later, connected to the Lochnagar mine crater).[44]

A burial mound in the bottom of the Lochnagar Crater, September 1917. (c) IWM Q49394.
Although the Lochnagar mine gave some assistance to the British attack, Germans losses caused by the explosion were subject to a confused and exaggerated claim from the British side. The GHQ Inspector of Mines, Brigadier-General R. N. Harvey, visited a week after the attack and spoke to the 179th officers who had been on duty. He later described the effect that the Lochnagar mine was believed to have had on the Germans:
We reckoned we closed in 9 deep dug-outs, each with an officer and 35 men – for prisoners were taken from the next dug-out, they were all marched out and the officer said there were 9 other dug-outs with the same numbers of inhabitants as his, i.e. 9 x 1 officer and 35 men – 9 officers and 315 men. As a result, our troops went over with few casualties.[45]
The British Official Historian erroneously ascribed Harvey’s claim to the Y Sap mine rather than Lochnagar but neither Harvey’s estimate of the German losses nor his claim of light casualties to the attackers are supported by the evidence and there is no record of any British attempt to excavate German dugouts collapsed or destroyed by the mine.[46] German records show that nothing like the number of men referred to by Harvey was holding the affected front line which was part of the sector of the 5th Company of 110th Reserve Infantry Regiment. An analysis of casualty reports shows that this company suffered 109 casualties between 27th June and 3rd July, of which 35 were reported as killed or missing (killed) on 1st July.[47] It is possible therefore that the garrison of no more than one German dugout was lost as a result of the explosion of the Lochnagar mine.
La Boisselle fell to the British on 4th July, but James Young did not see the crater of the Lochnagar mine before he was wounded on 8th July. He survived the war, and died in 1949.
After the Y Sap crater was filled in during the 1970s, the Englishman Richard Dunning purchased the crater to ensure its preservation to which aim the Friends of Lochnagar work today.

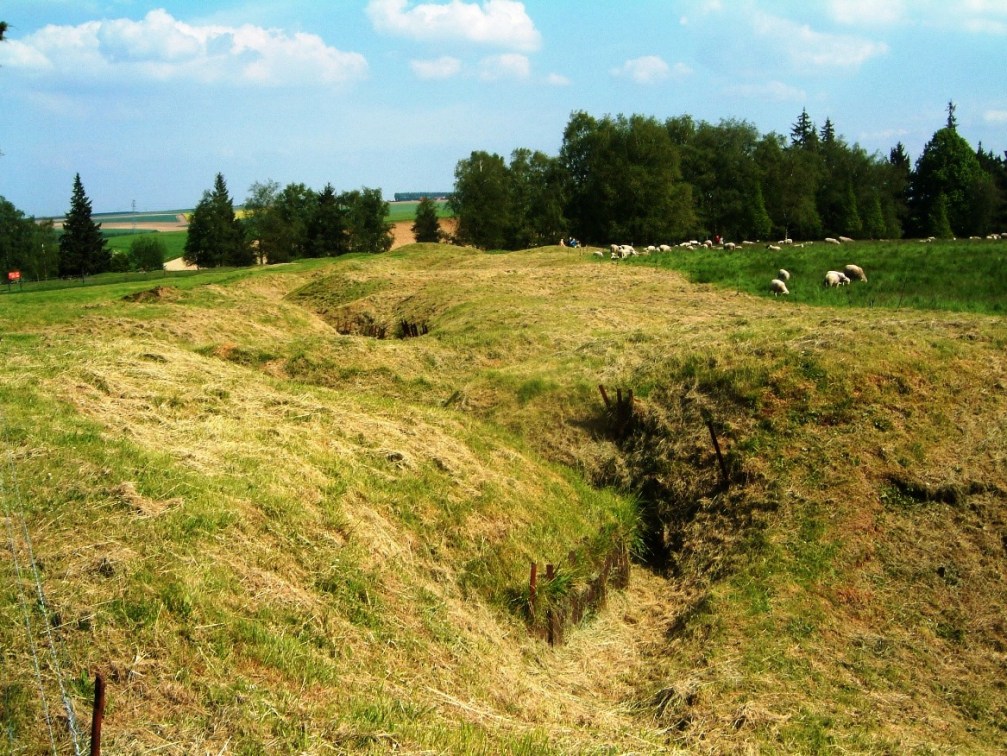
The Lochnagar Crater today (Wikimedia Commons).
See below for the references to this article.
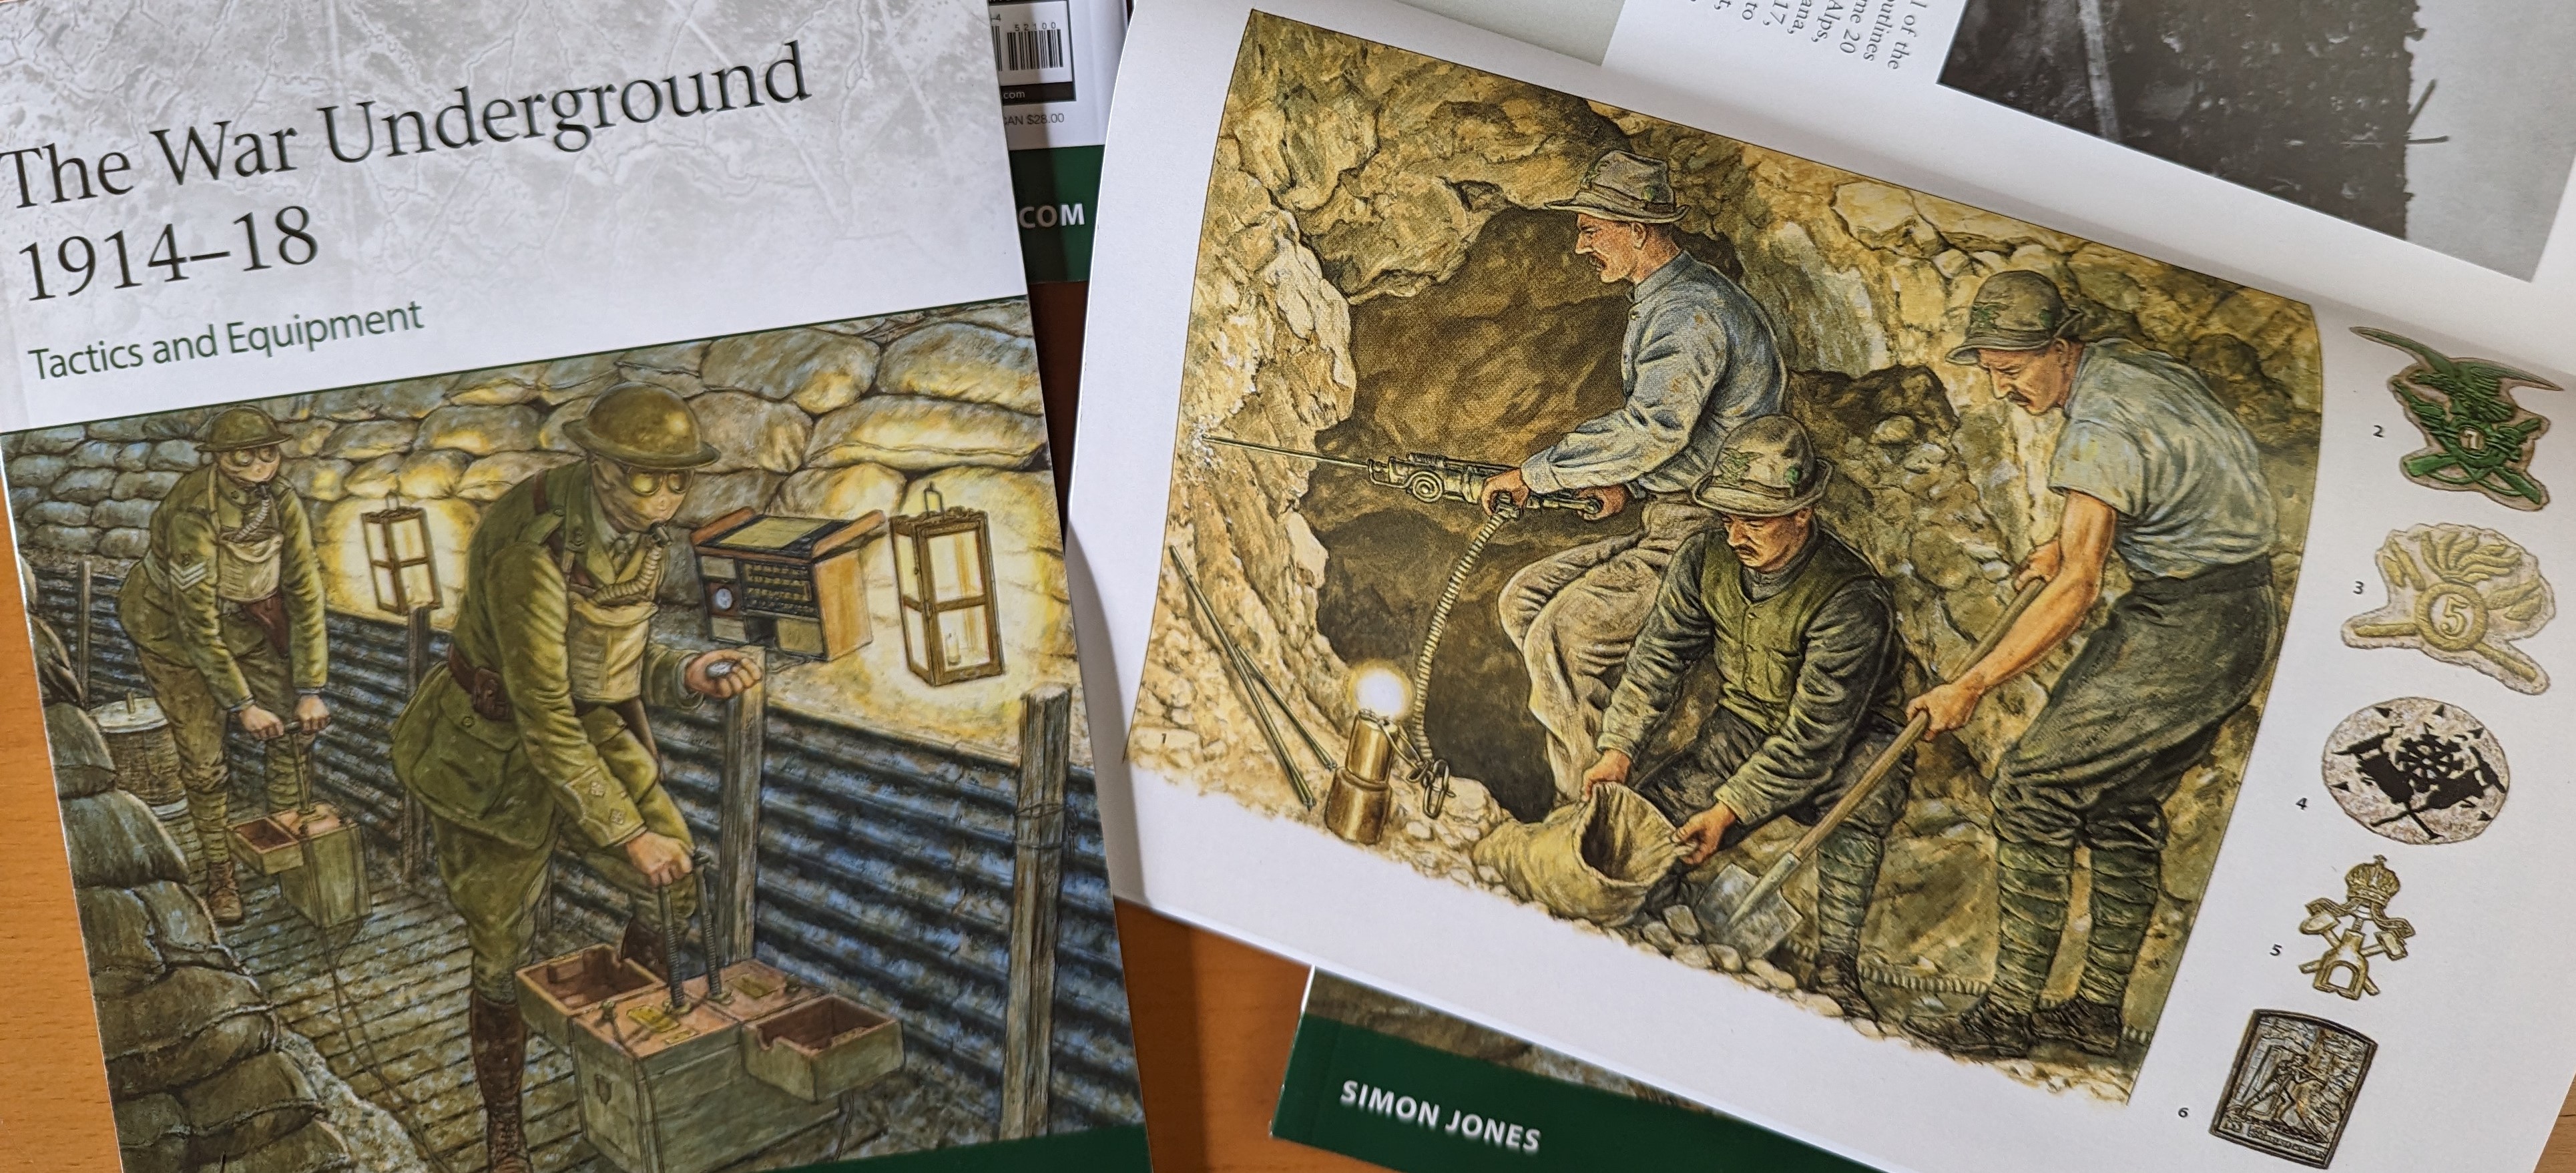
Buy signed copies of The War Underground 1914-18 and World War I Gas Warfare (Osprey Elite Series)

Myths of Messines: Four Misconceptions about the 1917 Battle Re-examined

Shirebrook Miners in the Tunnelling Companies

Buy Underground Warfare 1914-1918 at a reduced price

Myths of Messines: The Lost Mines

Understanding the 1914 Christmas Truce
More pages:
Men of 179th and 185th Tunnelling Companies
Video lecture Born Fighters: Who were the Tunnellers?
Virtual Tour of Tunnels and Trenches excavated at La Boisselle.
Contact me
The Lochnagar Mine: References
[1] Information about underground warfare at the Glory Hole can be found at http://www.laboisselleproject.com/.
[2] Details about the progress of the Lochnagar mine are from War Diaries of 185th and 179th Tunnelling Companies, and reports in brigade and divisional War Diaries in the UK National Archives.
[3] [War Office], Military Engineering Vol. IV Demolitions and Mining, (London, 1923), p. 143.
[4] 21/10/1915 Reports by John Norton-Griffiths, National Archives WO158/129.
[5] J. Young, ‘Notes on 179 Company R.E.’, Tunnellers’ Old Comrades Association Bulletin, No. 13, (1938), pp. 70-72.
[6] Possibly Richardson intended a ‘fougasse’, whereby the effect of burying the German trenches with a mass of debris was increased by first blowing a shallow mine then immediately afterwards a deeper charge.
[7] J. W. Burrows, The Essex Regiment 9th, 10th, 11th, 13th & 15th Battalions, (Southend-on-Sea, n.d.), p. 149.
[8] 53 Brigade WD, Intelligence Report 23-24/1/16; Brigade Operations Report 30/1-5/2/16; R. Whitehead, The Other Side of the Wire, Vol. 1, (Solihull, 2010), pp. 354-357.
[9] Young, ‘Notes on 179 Company R.E.’, op. cit.
[10] H.M. Hance, letter to J. E. Edmonds, June 1930, CAB45/134.
[11] Young, ‘Notes on 179 Company R.E.’, op. cit.
[12] Hance to Edmonds, op. cit.
[13] Mining plans, 179th and 185th Tunnelling Companies, National Archives, WO153/904.
[14] Bullock, ‘Exploits in the First World War’, op. cit.
[15] H.M. Hance, Weekly Mine Report, 5/7/16, 34 Division GS War Diary.
[16] Kriegstagebücher, Pionierbataillon Nr. 13, 1. Reserve-Kompanie M414 Bd. 251-260, Landesarchiv Baden-Württemberg Hauptstaatsarchiv Stuttgart.
[17] Young, ‘Notes on 179 Company R.E.’, op. cit.
[18] R.U.H. Buckland, ‘Experiences At Fourth Army Headquarters’, Royal Engineers Journal, 1927, p. 386.
[19] T.S. transcript of interview with H. R. Kerr by A. Barrie, c. 1959, Barrie Papers, Royal Engineers Museum.
[20] A.G.B. Urmston, letter to J. E. Edmonds, 11/6/1930, National Archives, CAB45/191.
[21] S. Jones, Underground Warfare 1914-1918, (Barnsley, 2010), pp. 118-120.
[22] III Corps Operation Order No. 70, 20/6/1916 III Corps GS War Diary; 103 Infantry Brigade Operation Order No. 24, 21/6/16 103 Brigade GS War Diary; 101 Brigade Operation Order No. 34 23/6/16, 101 Brigade GS War Diary.
[23] 1st Brigade, Canadian Field Artillery War Diary; 1st Canadian Infantry Battalion War Diary; A. Fortescue Duguid, Official History of the Canadian Forces in the Great War 1914-1919, General Series Vol. I, (Ottawa, 1938), pp. 487-489.
[24] The largest mine on the Western Front was 50 tonnes, blown by the Germans at Vauquois on 14 May 1916; the largest British mine of the war was 43.2 tonne mine blown at St. Eloi on 7 June 1917. See S. Jones, Underground Warfare 1914-1918, op. cit., pp. 63-64.
[25] Bullock, ‘Exploits in the First World War’, op. cit.
[26] Bullock, op. cit.
[27] Unidentified soldier of the 10th Lincolns quoted E. Swinton (ed.), Twenty Years After, Vol. 2, (London, n.d.), p.928.
[28] J.C. Neill (ed.), The New Zealand Tunnelling Company 1915-1919, (Auckland, 1922), p. 47.
[29] Bullock, op. cit.
[30] ibid.
[31] ibid.
[32] Pte Elliott, 20/Northumberland Fusiliers (Tyneside Scottish), quoted G. Stewart & J. Sheen, Tyneside Scottish, (Barnsley, 1999), p. 97.
[33] S. C. Bullock, Address to Rotarians, (n.d.), unpublished T.S., courtesy Mrs. A. Russell.
[34] There is no evidence of anyone claiming to have heard mine explosions in England on 1st July 1916. This is apparently confused with the claim of the Prime Minister Lloyd George to have heard the detonation of the Messines mines on 7th June 1917, which itself is implausible: it is more likely that he heard the opening artillery salvo.
[35] Lewis appears to have greatly over-estimated the height to which the debris was thrown by the explosion. Cecil Lewis, Sagittarius Rising, (London, 1977), p. 89.
[36] Capt. Herries, 22/Northumberland Fusiliers (Tyneside Scottish), quoted G. Stewart & J. Sheen, Tyneside Scottish, (Barnsley, 1999), p. 98.
[37] Lt Col E K Cordeaux, quoted in P. Bryant, Grimsby Chums: the Story of the 10th Lincolnshires in the Great War, (Hull 1990), p. 58; M. Middlebrook, The First Day on the Somme 1 July 1916, (London, 1971), p. 120.
[38] Pte. H. Baumber quoted in P. Bryant, Grimsby Chums: the Story of the 10th Lincolnshires in the Great War, (Hull 1990), p. 56-57.
[39] Unidentified soldier of the 10th Lincolns quoted in E. D. Swinton (ed.), Twenty Years After, Vol. 2, (London, n.d.), p.928.
[40] Information from M. and T. Beech, Multi-Limn Survey, pers. comm. via P. Barton, 2013.
[41] J. E. Edmonds, Military Operations France and Belgium, 1916, Vol. 1 (London, 1932), pp. 375-384.
[42] R. Whitehead, The Other Side of the Wire, Vol. 1, (Solihull, 2013), Vol. 2, pp. 296-7.
[43] H.M. Hance, Weekly Mine Report, 5/7/16, 34 Division GS War Diary.
[44] A map in the British official history erroneously shows the tunnel running into the Lochnagar crater, J. E. Edmonds, Military Operations France and Belgium, 1916, Vol. 1, op. cit., Map Volume, map 8.
[45] R.N. Harvey, letter to J. E. Edmonds, n.d. (c. 1930) CAB45/189.
[46] J. E. Edmonds, Military Operations France and Belgium, 1916, Vol. 1, op. cit. p. 382, fn.
[47] My grateful thanks go to Ralph Whitehead for collating and providing this data. The number killed or missing but not taken prisoner on 1st July was 35, and another eight missing but not prisoners during the period, i.e. a total of 43 men. See also R. Whitehead, The Other Side of the Wire, Vol. 2, (Solihull, 2013).
(c) Simon Jones


![British_55th_Division_gas_casualties_10_April_1918[1]](https://simonjoneshistorian.com/wp-content/uploads/2014/02/british_55th_division_gas_casualties_10_april_19181.jpg?w=1008)