The ambulance wagon at Ecoivres: Ralph Vaughan Williams’ Pastoral Symphony & the Great War

On the last day of 1914, at the age of forty-one, the composer Ralph Vaughan Williams lied about his age to join the ranks of the Royal Army Medical Corps. He was to serve in the Army for the remainder of the First World War.

Ralph Vaughan Williams with the 2/4th London Field Ambulance at Saffron Walden in 1915. (© Vaughan Williams Foundation)

The experience inspired his Pastoral Symphony, completed in 1922, as an elegy to the dead of the war. In particular, in an often-quoted letter to his future wife Ursula Wood, he recalled that it grew out of his time as a medical orderly in France in 1916:

It is really war time music – a great deal of it incubated when I used to go up night after night in the ambulance wagon at Ecoiv[r]es & we went up a steep hill & there was a wonderful Corot-like landscape in the sunset – it’s not really Lambkins frisking at all as most people take for granted.[1]

Vaughan Williams served with the 2/4th London Field Ambulance, with which he was posted to France in June 1916. The following month it took over a sector of front in the chalk downland of Artois, where it was responsible for evacuating and treating the wounded. This unit was based at the village of Ecoivres, 4.2 miles behind the front line, where it operated a Main Dressing Station, bringing wounded each night from an Advanced Dressing Station.

Scheme for Evacuating Sick and Wounded from 60th Divisional Area (Provisional), 26 July 1916 (detail).[2]

Unlike villages closer to the front line, which were utterly destroyed after being retaken from the Germans during bitter fighting, Ecoivres was largely untouched. Its location close behind the lines made it valuable for billeting troops as well as housing medical and logistic units.

Graffiti left by British and Canadian soldiers on Ecoivres church still bears witness to its role during 1914-18.

The buildings used as the Main Dressing Station are today still the village school.

The Main Dressing Station was located in the former village school. On arrival in July, the officer commanding found it ‘full of sick & wounded not yet attended to or evacuated.’[3] Over the coming weeks, he expanded the facilities, obtaining the use of huts behind the school buildings.

This plan survives in the War Diary of the Canadian medical unit which took over running the Ecoivres Main Dressing Station later in 1916.[4]

The classroom on the right was the sick parade room, on the left was the Orderly Room.

Vaughan Williams’ work collecting wounded was to take him into the valley beneath the German-held Vimy Ridge. Already the scene of heavy fighting during the previous eighteen months, it had become known as ‘Zouave Valley’ after the bodies of French Algerian troops killed trying to take the ridge.

Scheme for Evacuating Sick and Wounded from 60th Divisional Area (Provisional), 26 July 1916.[5]

Each night, under cover of darkness, a convoy of motor ambulances collected the wounded from the Advanced Dressing Station and took them to the Ecoivres. Vaughan Williams described his experience of active service in a letter to his friend Gustav Holst:

I am very well & enjoy my work –  all parades & such things cease. I am ‘Wagon orderly’ and go up the line every night to bring back wounded & sick on a motor ambulance –  this all takes place at night –  except an occasional day journey for urgent cases. [6]

The observation afforded to the Germans by Vimy Ridge made it unsafe to take the motor ambulances across the valley in daylight. The steep hill he later recalled to Ursula was just outside Ecoivres and was followed by a descent into Zouave Valley.

The ambulance route from the MDS to the ADS, the view to the southeast, with the front line on Vimy Ridge to the left (Google Earth).

The devastation of shellfire was localised to the front line and recaptured areas, the area around Ecoivres and much of the journey up to the Advanced Dressing Station made by Vaughan Williams in the summer of 1916 was through countryside closely resembling how it looks today. This contrast, between the ugly destruction and human tragedy of war and the proximity of gentle unspoilt countryside, powerfully suggest themselves as the inspiration for the Pastoral Symphony.

The return journey to Ecoivres, with the ruined abbey of Mont St. Eloi a well-known landmark. (Google Earth).

The Advanced Dressing Station, near a dangerous crossroads known as Aux Rietz, was just over a mile from the front line and had to be located underground to protect against shellfire.

The underground Advanced Dressing Station at Aux Rietz, depicted just before it was taken over by the 2/4th London Field Ambulance.[7]

The site of the Aux Rietz Advanced Dressing Station, beneath the earth embankment on the right (Google Earth).

Today a vast French war cemetery, La nécropole nationale de Neuville-Saint-Vaast, is directly opposite the former location of the Advanced Dressing Station. In the above photograph, La Targette British Cemetery can also be seen in the distance beyond the French nécropole.

Plan of the headquarters buildings in Ecoivres, as taken over by 9th Canadian Field Ambulance in October 1916. [8]

The headquarters, stores and accommodation for the personnel of the 2/4th London Field Ambulance were also situated in Ecoivres, a little way up the main street from the school buildings in a large house which also still survives.

The house and outbuildings in Ecoivres used by the 2/4th London Field Ambulance in 1916.

Vaughan Williams’ memory of a bugler practicing during the war, which he echoed in a trumpet cadenza in his Pastoral Symphony, is sometimes said to have dated from his time at Ecoivres. In fact, he stated later, in a letter to the principal trumpet in the Hallé Orchestra, that he had heard this was while stationed at Bordon, training for the Artillery in 1918.[9]

The 2/4th London was relieved in October 1916 as part of the build-up of Canadian units for the assault and capture of the Vimy Ridge which occurred in April 1917. By this time, Vaughan Williams and the 2/4th London Field Ambulance were serving in Greece.

Further Reading

Stephen Connock, ‘The Edge of Beyond’, Journal of the Ralph Vaughan Williams Society, No. 16 October 1999. https://rvwsociety.com/wp-content/uploads/2016/07/rvw_journal_16.pdf

Contact me


[1] Hugh Cobbe (ed.), Letters of Ralph Vaughan Williams, 1895-1958, (Oxford, 2008), pp. 264-5.

[2] War Diary, Assistant Director Medical Services, 60th Division (UK National Archives WO 95/3026).

[3] War Diary, 2/4th London Field Ambulance (UK National Archives WO 95/ 3029).

[4] War Diary, 9th Canadian Field Ambulance (RG9-III-D-3, Library & Archives Canada https://recherche-collection-search.bac-lac.gc.ca/eng/home/record?app=fonandcol&IdNumber=2005074).

[5] War Diary, Assistant Director Medical Services, 60th Division, (UK National Archives WO 95/3026).

[6] Hugh Cobbe (ed.), Letters of Ralph Vaughan Williams, 1895-1958, (Oxford, 2008), p. 109.

[7] David Rorie, A medico’s luck in the war being reminiscences of R.A.M.C. work with the 51st (Highland) Division, (Aberdeen, 1929).

[8] War Diary, 9th Canadian Field Ambulance (RG9-III-D-3, Library & Archives Canada https://recherche-collection-search.bac-lac.gc.ca/eng/home/record?app=fonandcol&IdNumber=2005074).

[9] Letter to Arthur Butterworth, 25 May 1949, Hugh Cobbe (ed.), Letters of Ralph Vaughan Williams, 1895-1958, (Oxford, 2008), pp. 450-1.


Join me on a battlefield tour with The Cultural Experience:

Simon Jones Battlefield Tour Somme Poets 2019

The Battles of the Marne & the Aisne 1914 – 1918

First & Last Shots 1914 & 1918

Medics & Padres in the Great War

Walking Ypres 1914-1918

Walking the Somme, Summer 2023


John Nash Over the Top SimonJonesHistorian

‘It was in fact pure murder’: John Nash’s ‘Over the Top’


Vincent Faupier19698175Res

Who was Ivor Gurney’s ‘The Silent One’? The night attack by the 2/5th Glosters on 6-7 April 1917


YouTube Talk – Underground Warfare 1914-1918

In this presentation I describe the techniques and technology that civilian miners and mining engineers brought to the tunnelling war. Thanks to Subterranea Britannica for providing the platform.


Join me on a battlefield tour with The Cultural Experience:

Tunnellers on the Western Front: The Underground War, 15th-18th September 2023

Aerial photo WW1 mine explosion craters Messines

The Ypres Salient War Poets: ‘A Bitter Truth’

Ramparts Cemetery Ypres

Ramparts Cemetery (Corinne P/TripAdvisor)

A Battlefield Tour with The Cultural Experience, 7th – 10th July 2022

I have designed this new, four-day tour for The Cultural Experience combining history, literature and art to experience the infamous Ypres battlefield. Through the words of more than twenty British and German writers, we explore the war in the trenches, the dressing stations, the rest areas, and the cemeteries. This is an opportunity to study works of literature and art in the precise locations which inspired them and where they were created. Combined with a rich historical context, travellers can gain a powerful understanding of these works both artistically and as historical testimony.

Full details are on The Cultural Experience website.

We walk ‘Plug Street Wood’, where Roland Leighton picked the violets growing around a corpse to send to his fiancée Vera Brittain, visit the battlefield graves of poets such as Francis Ledwidge and Hedd Wynn, both killed on the first day of the Passchendaele offensive, and look across no man’s land where Henry Williamson took part in the 1914 Christmas Truce. At Vladslo German Cemetery we will see Käthe Kollwitz’s sculptures of grieving parents which kneel before graves including that of her own son. The tour is the result of many years of experience reading, researching and visiting the battlefields as well as teaching literature and art of the Great War at Liverpool and Lancaster Universities.

Käthe Kollwitz sculptures, Vladso German Cemetery

Käthe Kollwitz sculptures, Vladso German Cemetery

What was ‘The Salient’? 

Devastated by four years of shellfire and fighting, for the British the Ypres battlefield, guarding the Channel ports, was the key to the Western Front. The Germans held a natural amphitheatre of high ground, curved like the blade of a sickle with the handle formed by the Messines ridge to the south. This was the ‘Salient’ in which the British were surrounded on three sides, always observed and subjected to lethal shelling.

Paul Nash, The Ypres Salient at Night-Art.IWM ART 1145

Paul Nash, The Ypres Salient at Night (IWM ART 1145)

Sanctuary Wood Trenches Ypres

Sanctuary Wood Trenches

In time when there was less public display of emotion, poetry was a means for soldiers to express and try to come to terms with and express experiences of grief, trauma and intense comradeship. Poetry also became a means whereby soldiers at the front tried to educate those at home about the realities of the war: ‘I died in hell—(They called it Passchendaele)’, says a soldier in Siegfried Sassoon’s poem. Artists such as Paul Nash also saw this as a duty. Angered by the devastation of the Ypres Salient, he wanted his pictures to tell ‘a bitter truth’.

Highlights

  • Powerful war literature and art in a historic Flanders landscape.
  • Little-known cemeteries and sites and the famous Menin Gate, Tyne Cot Cemetery and Talbot House.
  • See where The Wipers Times was printed in Ypres Ramparts.
  • Women writers such as May Wedderburn Cannan and Katherine Mansfield.

May Wedderburn Cannan

VAD nurse May Wedderburn Cannan, third from right (maywedderburncannan.wordpress.com)

Full details are on The Cultural Experience website.

Itinerary

Day 1 – The German experience, Medics and Padres.

Depart London St Pancras by Eurostar to Lille. Drive to Vladslo German Cemetery, Käthe Kollwitz sculptures, works by Ernst Stadler, August Stramm, Gerrit Engelke and Erich Maria Remarque. Essex Farm Cemetery and Canal Bank, where John McCrae wrote ‘In Flanders Fields’, Zillebeke Lake and Railway Dugouts Cemetery, works by Studdert Kennedy, ‘Tubby’ Clayton, Robert Service, and artists Wyndham Lewis and Paul Nash.

Essex Farm bunkers

Essex Farm Dressing Station bunkers

Zillebeke Lake

Zillebeke Lake

Paul Nash, Rain Zillebeke-Art.IWM ART 1603

Paul Nash, Rain Zillebeke (IWM ART 1603)

Day 2 – The Salient and ‘Third Ypres’

In the morning Hell Fire Corner, Menin Road, Sanctuary Wood trenches, works by Edmund Blunden, Herbert Asquith and The Wipers Times. After lunch, the Third Battle of Ypres: Pilckem Ridge, Artillery Wood Cemetery, graves of Hedd Wynn and Frances Ledwidge, works by David Jones, Blunden, John Collinson Hobson, Edmund Campion Vaughan and Ivor Gurney. Tyne Cot Cemetery where the poets J E Stewart, E F Wilkinson and W R Hamilton are commemorated. Evening Menin Gate Last Post Ceremony.

Shell craters, Sanctuary Wood

Shell craters, Sanctuary Wood

Edmund Blunden

Edmund Blunden

Edmund Campion Vaughan's bunker, St Julien

Edmund Campion Vaughan’s bunker, St Julien

Day 3 – Behind the Lines

To Vlamertinghe Military Cemetery and chateau, the grave of Harold Parry and works by Robert Nichols and Blunden. Poperinge, the prison cells and Talbot House soldiers’ hostel, Blunden, Vaughan, R H Mottram and Ford Madox Ford. After lunch, drive south to Ploegsteert Wood and walk to the cemeteries, works by Roland Leighton, Vera Brittain, Katherine Mansfield, Henry Williamson and Alfred Ollivant.

Talbot House Poperinge

Talbot House, Poperinge

PloegsteertWoodCemetery(CWGC)

Ploegsteert Wood Cemetery (CWGC)

Roland Leighton

Roland Leighton

Day 4 – Walking Ypres Town

A day spent on foot. Rudyard Kipling and the War Graves Commission at Ypres Reservoir Cemetery including family inscriptions, Ypres Cathedral and Cloth Hall, William G Shakespeare, Blunden and Edith Wharton. Visit to In Flanders Fields Museum. Menin Gate, works by Charles Sorley, Robert Graves, E W Hornung, Anna Gordon Keown, C E A Philipps, J C Hobson, W S S Lyon, Siegfried Sassoon and Eric Haydon. Walk the Ramparts, The Wipers Times, Gilbert Frankau, Ramparts Cemetery, R W Sterling. Aftermath and loss, May Wedderburn Cannan, Margaret Sackville, Carola Oman and Marian Allen. Return to Lille for Eurostar.

Peter Kollwitz grave marker, In Flanders Fields Museum

Peter Kollwitz grave marker, In Flanders Fields Museum

Ramparts Cemetery (CWGC)

Ramparts Cemetery (CWGC)

Menin Gate

The Menin Gate (CWGC)

Full details are on The Cultural Experience website.


Join me on other battlefield tours with The Cultural Experience:

Tunnellers

The War Poets: Words, Music and Landscapes

First & Last Shots

Medics & Padres

Walking Ypres

Walking the Somme


EB-Literary Executors for the Vera Brittain Estate, 1970 and The Vera Brittain Fonds, McMaster University Library-CropBWenh

Where and how was Edward Brittain killed? The death in action of her brother Edward, in Italy in June 1918, forms the final tragedy of Vera Brittain’s memoir Testament of Youth.


Vincent Faupier19698175Res

Who was Ivor Gurney’s ‘The Silent One’? The night attack by the 2/5th Glosters on 6-7 April 1917


John Nash Over the Top SimonJonesHistorian

‘It was in fact pure murder’: John Nash’s ‘Over the Top’


North Russia 1919: Britain’s first air-dropped chemical weapons

Grantham N Russia RE Lib resDuring the closing stages of the military intervention in North Russia in 1919, British chemical munitions were improvised as effective aerial bombs for the first time in history. Here is a shorter version of my article published by the Imperial War Museum in 1999.

In July 1917, the Germans introduced a new type of chemical munition.  The Blue Cross shell was a ‘mask-breaker’ which could penetrate a soldier’s respirator filter causing temporary incapacity from choking and severe sinus irritation. The wearer would also tear off the gas mask and succumb to the effects of simultaneously fired lethal gas shells. The chemical was diphenylchlorarsine (DA), embedded in solid form in a glass bottle in the explosive of the shell. It would be pulverised into a fine dust by the detonation but the particles were mostly too large to be really effective.

Blue Cross Shell

The German ‘Blue Cross’ chemical shell containing DA in a glass bottle.

A more successful method was discovered by a British Gas Directorate officer at GHQ who placed a pinch of DA on his stove: the smoke from the heated chemical caused the evacuation of the entire building. The British developed a thermogenerator which heated the chemical to create a highly toxic smoke lasting for about two minutes. They also identified an improved substance, diphenylaminechlorarsine (DM or Adamsite), and the two thermogenerators were loosely known as the ‘M Device’. Though the effects were not thought to be permanent, test conditions caused in human subjects ‘the most appalling mental distress and misery’ and pain such that soldiers ‘had to be prevented from committing suicide; others temporarily went raving mad…’.

Q 16329-cr-generator-br

The ‘M Device’ Smoke Generator (IWM Q 13629)

Brigadier-General Foulkes, the Director of Gas Services in the British Expeditionary Force, hoped to use the M Device to implement his ‘favourite plan’ of discharging chemical weapons on a stupendous scale before a major attack. Troops wearing a respirator with a special filter which protected against the smoke would ignite and throw the smoke bombs before capturing positions on which the defenders were incapable of resistance. The Armistice in November 1918 however prevented such an attack from taking place.

M Device Foulkes-cr

Aerial view of a field trial of the M Device
(from Foulkes, GAS! The Story of the Special Brigade, 1934).

In early 1919, a North Russia Relief Force was assembled to enable the withdrawal of British forces, sent to Murmansk and Archangel in 1918 to prevent military stores from falling onto German hands, which was now threatened by the Bolshevik Red Army. The force was to be equipped with chemical munitions employed by both the Royal Artillery and the Special Brigade of the Royal Engineers. Winston Churchill, Secretary of State for War and Air, offered the commander of the force, Major-General Ironside, the ‘very secret’ M Device which he should only use ‘if specially necessary’. Ironside asked how well it worked in areas ‘closely shut in by forest’ where the wind was non-existent. This question was to be answered by sending a Special Brigade expert , Major Thomas Davies, who would sail in advance of the M Device to explain the new weapon.

Davies was a Tasmanian chemical engineer with extensive experience of gas attacks on the Western Front. His health damaged by poison gas, he had nevertheless helped to develop the M Device because of his firm belief that it would end the war. However, a road accident prevented Davies from sailing in advance the despatch to Archangel of 50,000 M Devices in May 1919. By July, Davies and nineteen other Special Brigade officers had also arrived at Archangel without knowing whether it was suitable for use in that theatre.

Map of European Russia Showing Railways Waterways Situation in Russia from Information Received up to Aug 12th 1919-macrepo_4080-crbr

The Murmansk and Archangel fronts, August 1918.
(Detail from https://digitalarchive.mcmaster.ca/islandora/object/macrepo%3A4080)

Prior to visiting the front, Davies planned to make an attack using 15-20,000 M Devices per mile but he found it thickly wooded, with the only clear area a 30 yard wide strip along which the railway line was constructed, permitting little or no breeze to carry the smoke towards the enemy. The terrain could not have been more different to the open agricultural land of northern France and the use of the M Device to cover the withdrawal of the North Russia force was nothing like that envisaged by Foulkes in his plans for a great break through assault. From late July to mid-August, Davies attempted to use the M Device in conjunction with infantry raids but always the wind strength and direction was always unsuitable.

Q 92426-SERVICE OF MAJOR MOORE VC 2ND BATTALION, THE HAMPSHIRE REGIMENT, NORTH RUSSIA 1919

Men of the 2nd Hampshires, Archangel front, 1919.
Davies tried unsuccessfully to carry out a raid using the M Device with this battalion.
© Imperial War Museum Q 92426

Undeterred by the lack of wind, Davies began trials to improvise M Device bombs which could be dropped from the air. When the Royal Air Force refused to allow its aircraft to be used, Davies obtained permission from Ironside. His Adjutant, Lieutenant Alderson, made twenty flights testing bomb designs until he was injured in a crash when DM got into cuts on his arms, causing skin eruptions. The trials were halted until Davies contrived to use newly-assembled aircraft at Archangel but the proximity to houses meant that DM had to be substituted for brick dust, a highly unpleasant task which fell on his officers.

Q 16330-cr

The ‘M Bomb’ made by adding a retarding vane and padded nose cone to the M Device.
© Imperial War Museum Q 16330

Eventually, Davies perfected a vane and retarder to control the descent of the bomb and a padded nose to prevent damage on impact. His servant, a plumber, made the prototypes and Ordnance Workshops in Archangel and a Royal Navy repair ship ultimately manufactured fittings for 1,500 bombs.

Thomas Davies and his servant (who is nowhere named in the records) display their M Bomb, North Russia 1919.
© Imperial War Museum Q 16330

slides-007

Special Brigade officers and Davies’ servant (shirtsleeves) assembling M bombs at Oberskaya Airfield on the Archangel front, 27 August 1919.
(UK National Archives WO106/1170)

Ironside wished to use the ‘M Bombs’ to support an attack on 10th August. Bomb racks were prepared on DH9 and DH9A aircraft but bad weather prevented their use. Eventually, on 27th the first M Bombs were used on the villages of Emtsa and Chunova, as preparation for an attack by Russian forces. At 12.30pm, 57 were dropped on Emtsa railway station, followed by another 62 at 7.30pm. The airmen reported the town obscured by the smoke and saw panicked troops fleeing into the surrounding woods. Red Army prisoners later described the effects. Private Kashevnikoff said that, when three aircraft dropped ten bombs about 40 yards from him, the smoke made his eyes water, he coughed badly, suffered head pains, and was ‘walking about as if drunk’. Thirty men of his company were also affected although he said that none were sent to hospital or died. He surrendered two days later, finding he was now frightened of shell fire.

slides-005-crbr

The first DH9 aircraft to take off from Oberskaya airfield carrying M Bombs, 27 August 1919.
Six bombs were carried externally (arrowed), 34 internally.
(UK National Archives WO106/1170)

The next day, 62 bombs were dropped on Emtsa and 69 on Plesetskaya. Four bombs fell near Private Leeposhkin, one about 10 yards away, causing him head pains, watering eyes, a sore throat, breathing difficulties and copious vomiting. Unable to stand, he lay down until carried into a barracks. Sickness and coughing prevented him from sleeping and he surrendered after three days.  On the day of the actual attack, on 29th, mist prevented further bombing but Russian troops captured Emtsa, taking 550 prisoners and all the forward artillery. The railway station remained held by an armoured train and bombing with the M Bombs was resumed in the evening.  Nine days later, a Special Brigade officer found a number of civilians in Emtsa ‘somewhat gassed’, while prisoners described gassed men lying prostrate on the ground, bleeding from the nose and mouth. Some still had fits of bleeding and were ‘in quite a useless state’.

Q 16329-cr bomb

A spent M Bomb after dropping.
© Imperial War Museum Q 16329

The village of Chunova was again bombed at the end of August and early September although the actual attack was postponed. Two more villages were bombed on 4th September in preparation for raiding. The attackers were warned not to enter the ‘smoked area’ until one and a half hours after the last bomb had been dropped, to avoid cellars, not to drink water and avoid skin contact with earth where the bombs had dropped. If the smoke was inhaled, they were told that a chloroform solution or cigarette smoking gave relief.  The tactics were refined, with the bombs dropped in a semicircle around the windward edges of the villages and some in the trees to the leeward where it was anticipated the victims would flee.  When Brigadier-General Grogan learned that only three of the expected six bombing aircraft would be available he limited the attack to the village of Pocha. Four aircraft bombed Pocha, the smoke obscuring it from view, and all fire quickly died away beneath the drifting clouds but resistance from outside the poisoned area caused Grogan not to launch the infantry attack.

Q 16148

General Rawlinson (light coat) with Ironside (dark coat) interrogating a Bolshevik prisoner, September 1919.
© Imperial War Museum Q 16148

The M Bombs were soon relied on by commanders to incapacitate the Red Army troops before the launch of the small-scale attacks. On 7th September, General Rawlinson, recently arrived as Commander-in-Chief in North Russia, inspected prisoners poisoned by the bombs and reported to the War Office that the M Bombs had been mainly responsible for the success of operations around Archangel.  The lack of fatal cases however left the chief Medical Officer sceptical about the effect of the ‘gas’. He visited Emtsa with the Consulting Physician who examined 46 affected prisoners and reported that the symptoms were temporary with most beginning to feel normal again after several days. This was to miss the point that temporary incapacity was all that was needed for the capture of positions. Davies examined the same prisoners and reported to Rawlinson:

I consider the results excellent and a definitive proof that in the Smoke Generator we have an extraordinary powerful weapon [sic].

Ironside also reported the bombs ‘a great success’, with the caveat that the results were small and local, ‘there is no doubt that the moral [i.e. psychological] effect on the enemy was very great and materially assisted the operations.’

Q 16759-Fairy 3c seaplanes preparing for flight from Lake Onega, Medvedje-Gora, 1919

Fairy IIIC seaplanes preparing for flight from Lake Onega, 1919.
© Imperial War Museum Q 16159

With Ironside’s operations around Archangel ending, on 9th September, six of Davies’ officers were sent with 250 M Bombs to assist the force around Murmansk, 150 miles to the northwest. The force commander, General Maynard, had been informed that Rawlinson was ‘very anxious for you to use this Gas’. Maynard planned to use the M bombs in an attack in mid-September to cover his withdrawal. Fairey IIIC seaplanes, based on Lake Onega, would each carry 40 bombs.

High winds negated the effect of bombs dropped in 12th and 13th. The village of Mikheeva Selga, attacked with 16 bombs on 13th and 30 the following day, was captured without resistance. On 14th, 30 bombs were dropped on Lijma and in still air the effect was reported by the RAF observer as ‘very good indeed’. A Special Brigade officer, Lieutenant Grantham, visiting the targets five days later found that strong defences appeared to have been hurriedly abandoned. After speaking to British officers and Bolshevik prisoners he concluded that the effect was ‘totally demoralising’. Maynard’s advance covered 20 miles in a day and further attacks were briefly postponed ‘until the arrival of more gas’.  Prisoners did not exhibit the usual symptoms of poisoning and the ‘moral’ effect seemed caused troops to abandon their positions.

Grantham N Russia RE Lib res

Special Brigade officer Lieutenant Grantham holding M Bombs, standing on the float of a Short 184 Seaplane, Lake Onega, September 1919.
© Royal Engineers Museum

High winds negated the effect of bombs dropped in 12th and 13th. The village of Mikheeva Selga, attacked with 16 bombs on 13th and 30 the following day, was captured without resistance. On 14th, 30 bombs were dropped on Lijma and in still air the effect was reported by the RAF observer as ‘very good indeed’. A Special Brigade officer, Lieutenant Grantham, visiting the targets five days later found that strong defences appeared to have been hurriedly abandoned. After speaking to British officers and Bolshevik prisoners he concluded that the effect was ‘totally demoralising’. Maynard’s advance covered 20 miles in a day and further attacks were briefly postponed ‘until the arrival of more gas’.  Prisoners did not exhibit the usual symptoms of poisoning and the ‘moral’ effect seemed caused troops to abandon their positions.

Q 16818-Bolshevik prisoners at Lijma Station waiting for instruction, 15th September 1919

Bolshevik prisoners at Lijma Station the day after capture following an M Bomb attack, 15th September 1919.
© Imperial War Museum Q 16818

Q 16821-A British sentry on the main street of Lijma, 16th September 1919

A British sentry on the main street of Lijma, 16th September 1919.
© Imperial War Museum Q 16821

On the 15th, the bombs again led to a Bolshevik withdrawal. The following day, however, advance by British forces ceased, to be continued by White Russian forces alone.  An attack on 20th without M bombs was ‘half-hearted’. On 22nd two seaplanes dropped forty bombs each, the smoke enveloped a village, surrounding trenches and a headquarters. No Bolshevik fire was reported but it was unclear if an attack was made. On 17th, the British dumped 47,000 remaining M Devices in the White Sea but seem to have left some for the White Russian forces after their final departure from North Russia on 12 October.

M Bomb test-001-cr

An M Device tested from a motorboat on Lake Onega, September 1919, photographed by Pilot Officer Blampied.
(Author/ B C Blampied)

On 23rd September, one of Davies’ officers, Major Saunders, inhaled smoke during a demonstration of the M Device to the general commanding the White Russian forces at Murmansk. He quickly suffered pains in his legs, head and back, then extreme debility, anaemia and diarrhoea.  In England three months later he could not lie down without feeling giddiness while another officer was still hospitalised with lassitude and fatigue four months after being exposed. The longer-term effects of DM exposure were felt by other Special Brigade officers. Davies had been incapacitated while demonstrating the M Device on 9th September. In March 1920 doctors found him:

pale, nervous, and suffering from various ‘phobia’. He would like to go back to Australia but dare not go on board ship.

DM, one of the few major novel chemical warfare agents developed by the British during the First World War, failed to live up to expectations. As was often the case, a new chemical warfare agent failed to behave as predicted when used in the field. Heralded as offering a breakthrough, its effect in practice was limited and local. In 1937 the British downgraded its status as a principal chemical weapon after trials found it less effective than the standard tear gas.

All references are in the full version of this article published in the Imperial War Museum Review, available via this link.


Join me on a battlefield tour with The Cultural Experience:

Simon Jones Battlefield Tour Somme Poets 2019

The War Poets: Words, Music and Landscapes, 10th-13th July 2023

First & Last Shots 1914 & 1918

Medics & Padres in the Great War

Walking Ypres 1914-1918

Walking the Somme, Summer 2023

More Information about Battlefield Tours


sawyer-spence

Understanding Chemical Warfare in the First World War


e4 105mm mustard

Yellow Cross: the advent of Mustard Gas in 1917


P1000901crop

The most effective chemical attack ever staged: the gas attack at Caporetto, 24th October 1917


Walking the Five Battles of Ypres, 28th September – 1st October 2018

Discover the most disputed battlefield of the Great War by walking the ground.  These six walks will enable both first-time and more experienced visitors to gain a deep understanding of the changing nature of the fighting, and the conditions endured.

Kemmel ypres battlefield tour

Mont Kemmel, from the 4th Ypres walk. (Simon Jones)

We explore the sacrifice of the ‘Old Contemptibles’ in 1914, the terrible first gas attacks of 1915, Passchendaele in 1917, and the dramatic ebb and flow of 1918.  Based in Ypres, the tour also includes an exploration of the history of this tragic yet beautiful town.  Traveller numbers are usually around a dozen, see The Cultural Experience website for full specifications including prices.  After travel by Eurostar from St. Pancras London to Lille, we are met by our vehicle and driver and keep travel time to the minimum.

Ypres Battlefield Walking tour Cloth Hall

The rebuilt Cloth Hall, St Martin’s Church and market square, Ypres.

Briefly occupied by the Germans in 1914, Ypres was desperately held by the Allies for four years.  Until the Allied advance in the final Fifth Battle, the Salient became a mass grave of first German and then British hopes of a breakthrough.  By walking the ground we discover the real human experience of the fighting, grasp the significance of the terrain, and understand the revolutionary changes in fighting methods during these five battles.

Ypres battlefield walking tour Gheluvelt shells

Shells at Gheluvelt (Simon Jones)

Day 1 – Ypres

Depart London St Pancras for Lille on the Eurostar arriving about midday.  This afternoon we walk the town of Ypres itself, see the Cathedral and Cloth Hall, and to hear of its remarkable survival and reconstruction.

We learn of the dangerous daily life of soldiers and a handful of civilians under fire, the soldiers’ canteen at ‘Little Toc H’, the Ramparts dressing station and cemetery, and the casemates which concealed the printing press of the ‘Wipers Times’.

Wipers Times Battlefield Tour

Day 2 – First and Second Ypres

This morning we follow the First Battle of Ypres during the autumn of 1914 and the desperate last push by the Germans following the ‘Race to the Sea’.

Gheluvelt Ypres Battlefield Walking Tour

The Worcesters aimed for Gheluvelt Church. (Simon Jones)

Starting at Black Watch Corner, we follow the Worcesters’ epic counterattack from Polygon Wood to Gheluvelt on 31st October 1914.

Worcesters Gheluvelt Ypres battlefield walking tour

The meeting of the 2nd Worcestershire with the 1st South Wales Borderers in the grounds of the Chateau, 31st October 1914 (J. P. Beadle).

Ypres Battlefield tour Gheluvelt

The rebuilt chateau at Gheluvelt which was the focus of the Worcesters’ counterattack (Simon Jones).

After lunch we turn to the Second Battle in the spring of 1915, following the first gas attack at Langemarck on 22nd April, from the German cemetery into the village.

Langemark Ypres Battlefield Walking Tour

Restored bunkers and a memorial wall in Langemark German Cemetery mark the front line from which chlorine gas was first used on 22nd April 1915 (Simon Jones).

We then look at the heroic stand by the Princess Patricia’s Canadian Light Infantry on Bellewaarde Ridge on 8th May and the German advance to Railway Wood.

PPCLI Ypres battlefield tour

The memorial to Princess Patricia’s Canadian Light Infantry with maple tree behind (Simon Jones).

In the evening we attend the moving Last Post ceremony at the Menin Gate before dinner.

Menin Gate Ypres Battlefield tour

The Missing of the Ypres Salient on the Menin Gate.

Day 3 – Third and Fourth Ypres

Meagher Tyne Cot Ypres battlefield walking tour

Lt. Norman Meagher was killed in the fighting for the ground on which Tyne Cot Cemetery now stands. (Simon Jones)

The Third Battle of Ypres, commonly known as Passchendaele, was one of the bloodiest and controversial of the war.  We start with the successful Australian attack at Broodseinde on 4th October 1917, following the advance up the ridge and the capture of the ground that became the vast Tyne Cot Cemetery.  When the Canadians took over the attack on Passchendaele, the fighting during November bogged down in the mud.

Passchendaele Ypres battlefield walking tour

A 1917 trench map and Passchendaele today.

In the afternoon we walk ‘Fourth Ypres’ with a short but steep ascent to follow the route of the German Alpine Corps in the rapid capture of Mont Kemmel during the Kaiser’s Offensive in April 1918.

Kemmel Ypres Battlefield Walking Tour

Mont Kemmel. (Simon Jones)

Day 4 – Fifth Ypres

The final battle of Ypres which opened on 28th September 1918 was part of the ‘Hundred Days’ which led to Allied victory on the Western Front.  Astonishingly, the whole Ypres Salient battlefield was re-captured in three days.  Exactly a century on, we focus on the capture by the 9th Scottish Division of the village of Ledeghem, today still dotted with concrete bunkers.

Ledegem bunker Ypres battlefield walking tour

The Ledegem bunker which we visit on the Fifth Ypres walk.

The war came full circle at Ledeghem: the cemetery contains the graves of cavalrymen who fell at the opening of the First Battle in October 1914.  Four years later, Second Lieutenant Gorle received the Victoria Cross for bringing his field guns to within 50 yards of the Germans, just as they had fought in 1914.

Gorle VC Ypres battlefield walking tour

Robert Gorle, who was awarded the VC for bravery at Ledegem, 1st October 1918.

Return to Lille for Eurostar back to London St Pancras.


I have been designing and guiding battlefield tours since 1997 and have taken well over a hundred groups to France, Belgium, Italy, Egypt, Libya, Britain, Canada and the USA. The Cultural Experience is a highly experienced tour operator which is ATOL Protected and a Travel Trust Association Member.

guided-historical-tours

Feedback from four of the travellers on my ‘Medics & Padres’ tour, August 2018:

It truly was the best and most informative tour we have been on.

It was a marvelous trip and gave us both new friends and a perspective on an aspect of the Great War of which we were ignorant.

Another excellent Great War tour… which was well-researched and presented.

I thoroughly enjoyed the trip and learned so much – thank you to you all for making it such a memorable few days.

Ypres Battlefield tour Ariane Hotel

‘Medics & Padres’ group in the private dining room of the Ariane Hotel, Ypres, August 2018.


Photo credit: Robert Gorle VC https://www.findagrave.com/memorial/8543779.


GE Birdcage offensive schemes3crop2

Myths of Messines: The Lost Mines


Vincent Faupier19698175Res

Who was Ivor Gurney’s ‘The Silent One’? The night attack by the 2/5th Glosters, 6-7 April 1917


1915: The First British Gas Masks

How the deadly effects of chlorine and phosgene gas were defeated by British scientists.  Researched using records in the UK National Archives and illustrated with exhibits from the Royal Engineers Museum, this two-part article ‘The First BEF Gas Respirators, 1915’ appeared in Military Illustrated, January & February 1991.

0102030405

See below for part two of the ‘First Gas Respirators, 1915.’


Join me on a battlefield tour with The Cultural Experience:

Tunnellers 12th – 15th June 2020

Walking the Somme 29th May – 1st June 2020

Medics & Padres 30th July – 2nd August 2020

Walking Ypres Autumn 2021


06070809


Join me on a battlefield tour with The Cultural Experience:

Simon Jones Battlefield Tour Somme Poets 2019

The War Poets: Words, Music and Landscapes, 10th-13th July 2023

First & Last Shots 1914 & 1918

Medics & Padres in the Great War

Walking Ypres 1914-1918

Walking the Somme, Summer 2023

More Information about Battlefield Tours


sawyer-spence

Understanding Chemical Warfare in the First World War


Edward Harrison

Edward Harrison, who gave his life to protect against poison gas


???????????????

Yellow Cross: Measures to protect against Mustard Gas


Contact

‘Pure murder’: John Nash’s ‘Over the Top’

Nash,_John_(RA)_-_'Over_The_Top'._1st_Artists'_Rifles_at_Marcoing,_30th_December_1917_-_Google_Art_Project-Res50In John Nash’s painting ‘Over The Top’ 1st Artists’ Rifles at Marcoing, 30th December 1917, the artist depicted a disastrous attack in which he himself took part.  A painting bereft of glory, it remains ‘an acknowledged masterpiece’ of war art.[1]  When John Nash later contrasted his work as an official War Artist in two conflicts he described his paintings from the First World War as ‘the result of actual vivid experience’, whereas those from the Second, ‘were really more commissioned and hadn’t a very warlike aspect at all’. [2]

Study for Over the Top Art.IWM ART 3908 SimonJonesHistorian

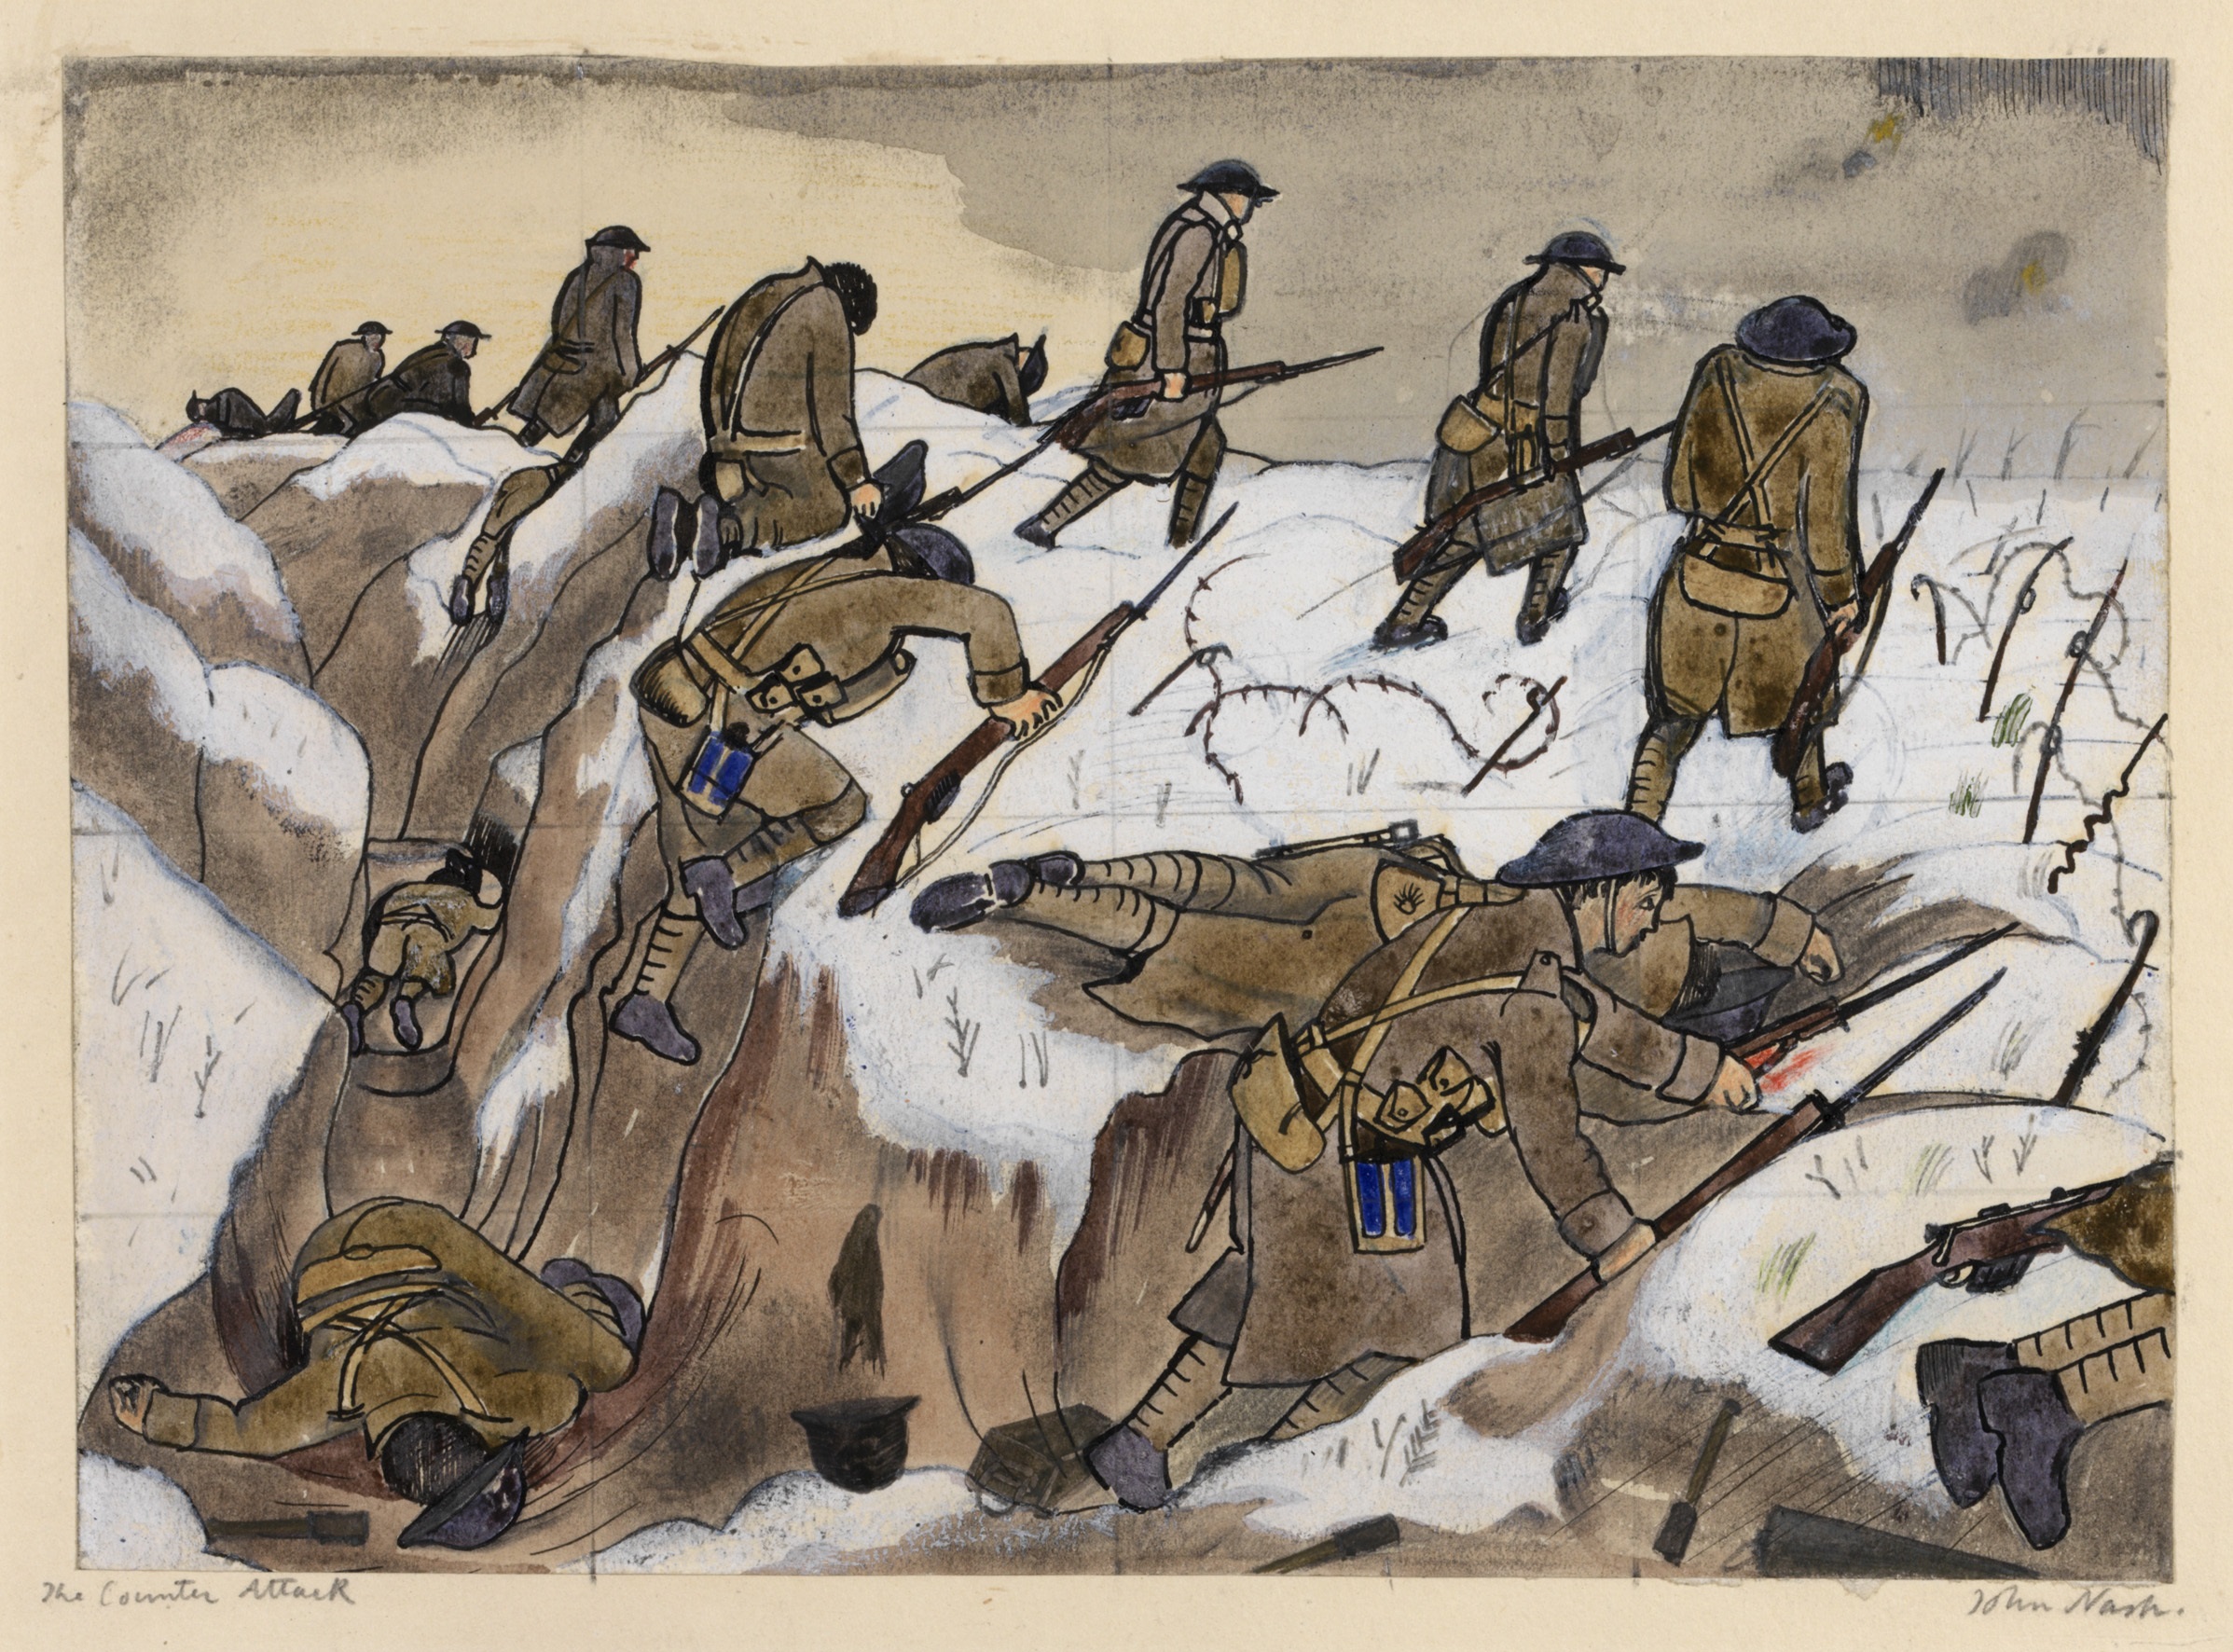
The smaller of two studies by John Nash for ‘Over the Top’ in the Imperial War Museum, this was entitled ‘The Counter Attack’.  © IWM (Art.IWM ART 3908)

Though not formally trained, Nash was a successful artist when he enlisted at the age of 23 as a private soldier in September 1916.  He joined the Artists’ Rifles, although by this time, Nash recalled, there weren’t any other artists serving in the Regiment. He was posted to the Western Front in November.

John Nash service record SimonJonesHistorian

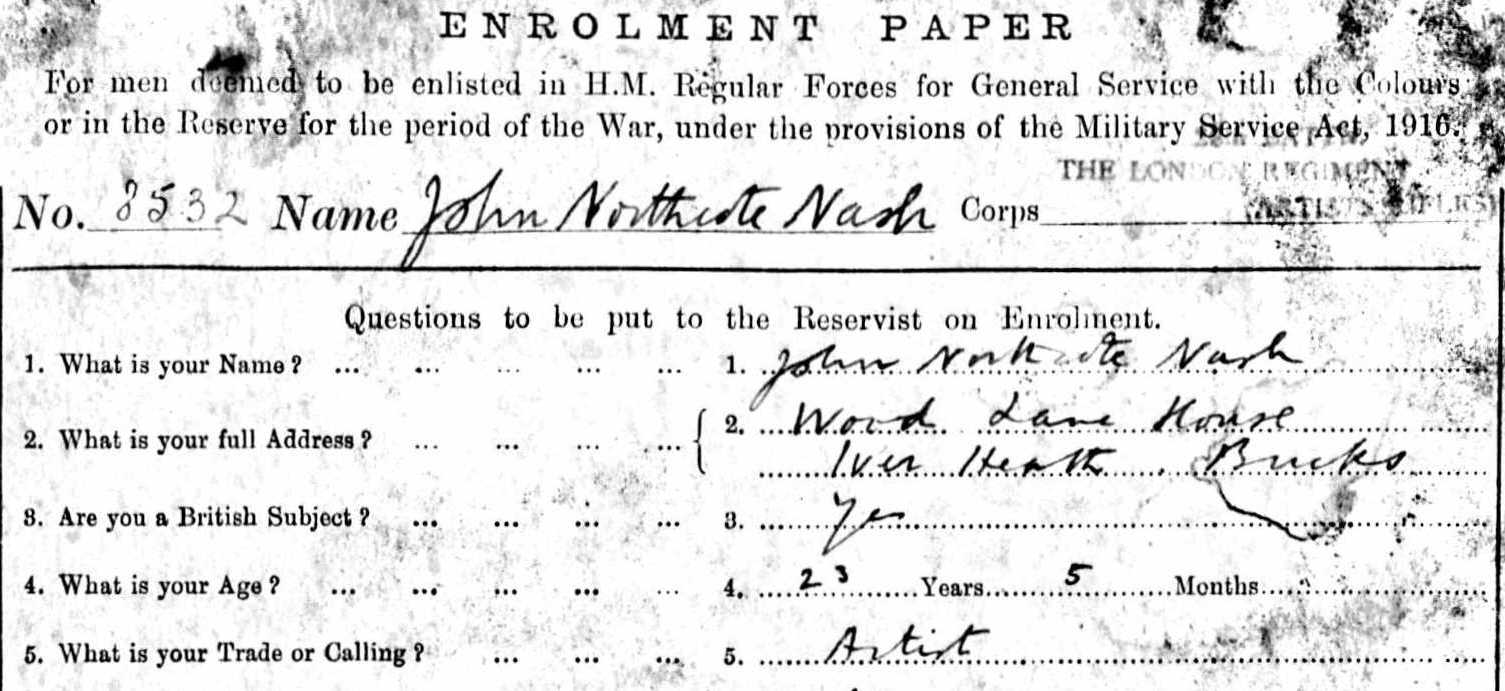
Part of John Nash’s enlistment document in the Artists Rifles, September 1915 (UK National Archives WO363).

Nash described the attack in 1974 to Joseph Darracott, Keeper of Art and Design History at the Imperial War Museum, both in a letter and during a long, recorded conversation but, by this time, as he himself acknowledged, his memories were uncertain.[3]  Not all of his recollections correspond either with contemporary official records, or with accounts by two other members of the Artists Rifles dating from the 1930s, but it is still possible to clearly match the painting with the recorded events of the brief but disastrous action.

John Nash NPG x127172 detail SimonJonesHistorian

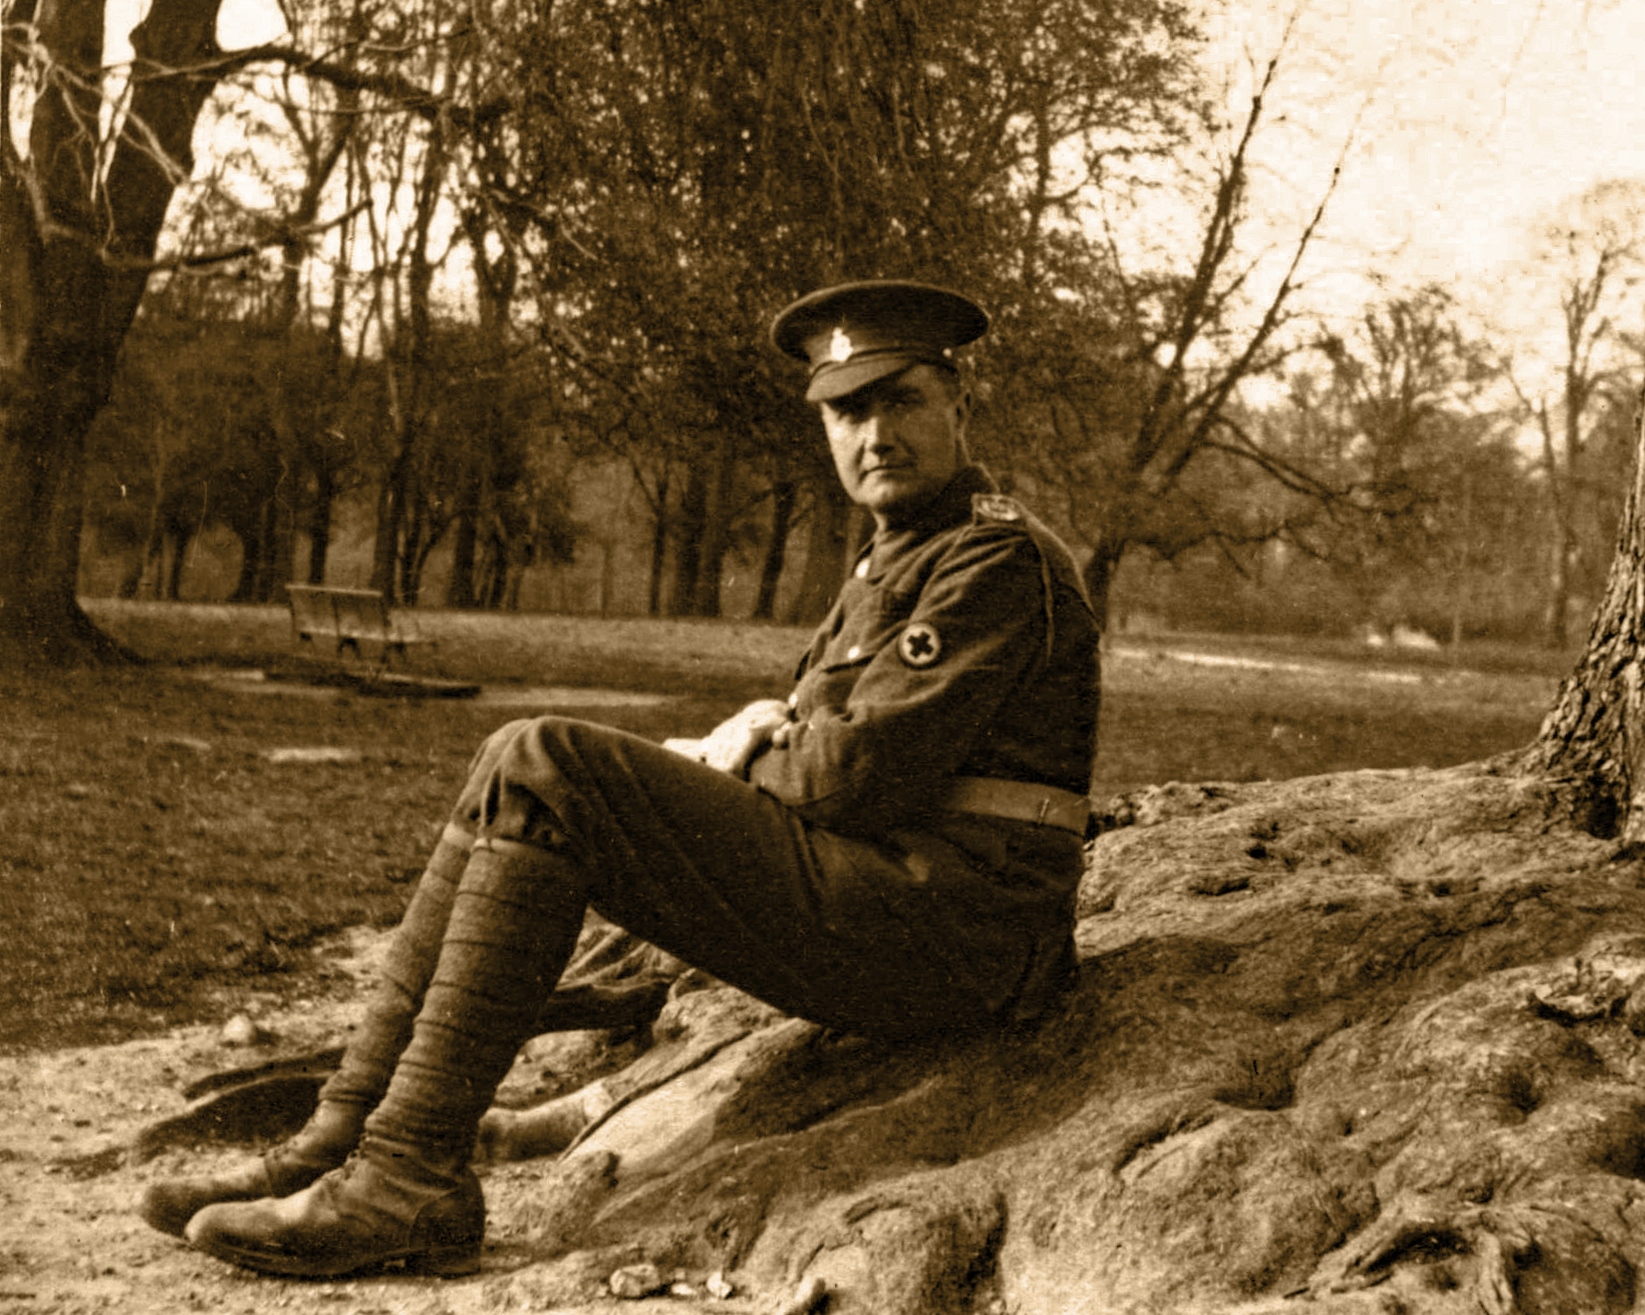
John Nash (seated on ground) as a Private soldier with a bombing section of the Artists Rifles, possibly the same section he commanded as a Corporal at the time of the attack (detail, National Portrait Gallery x127172, Creative Commons licence).

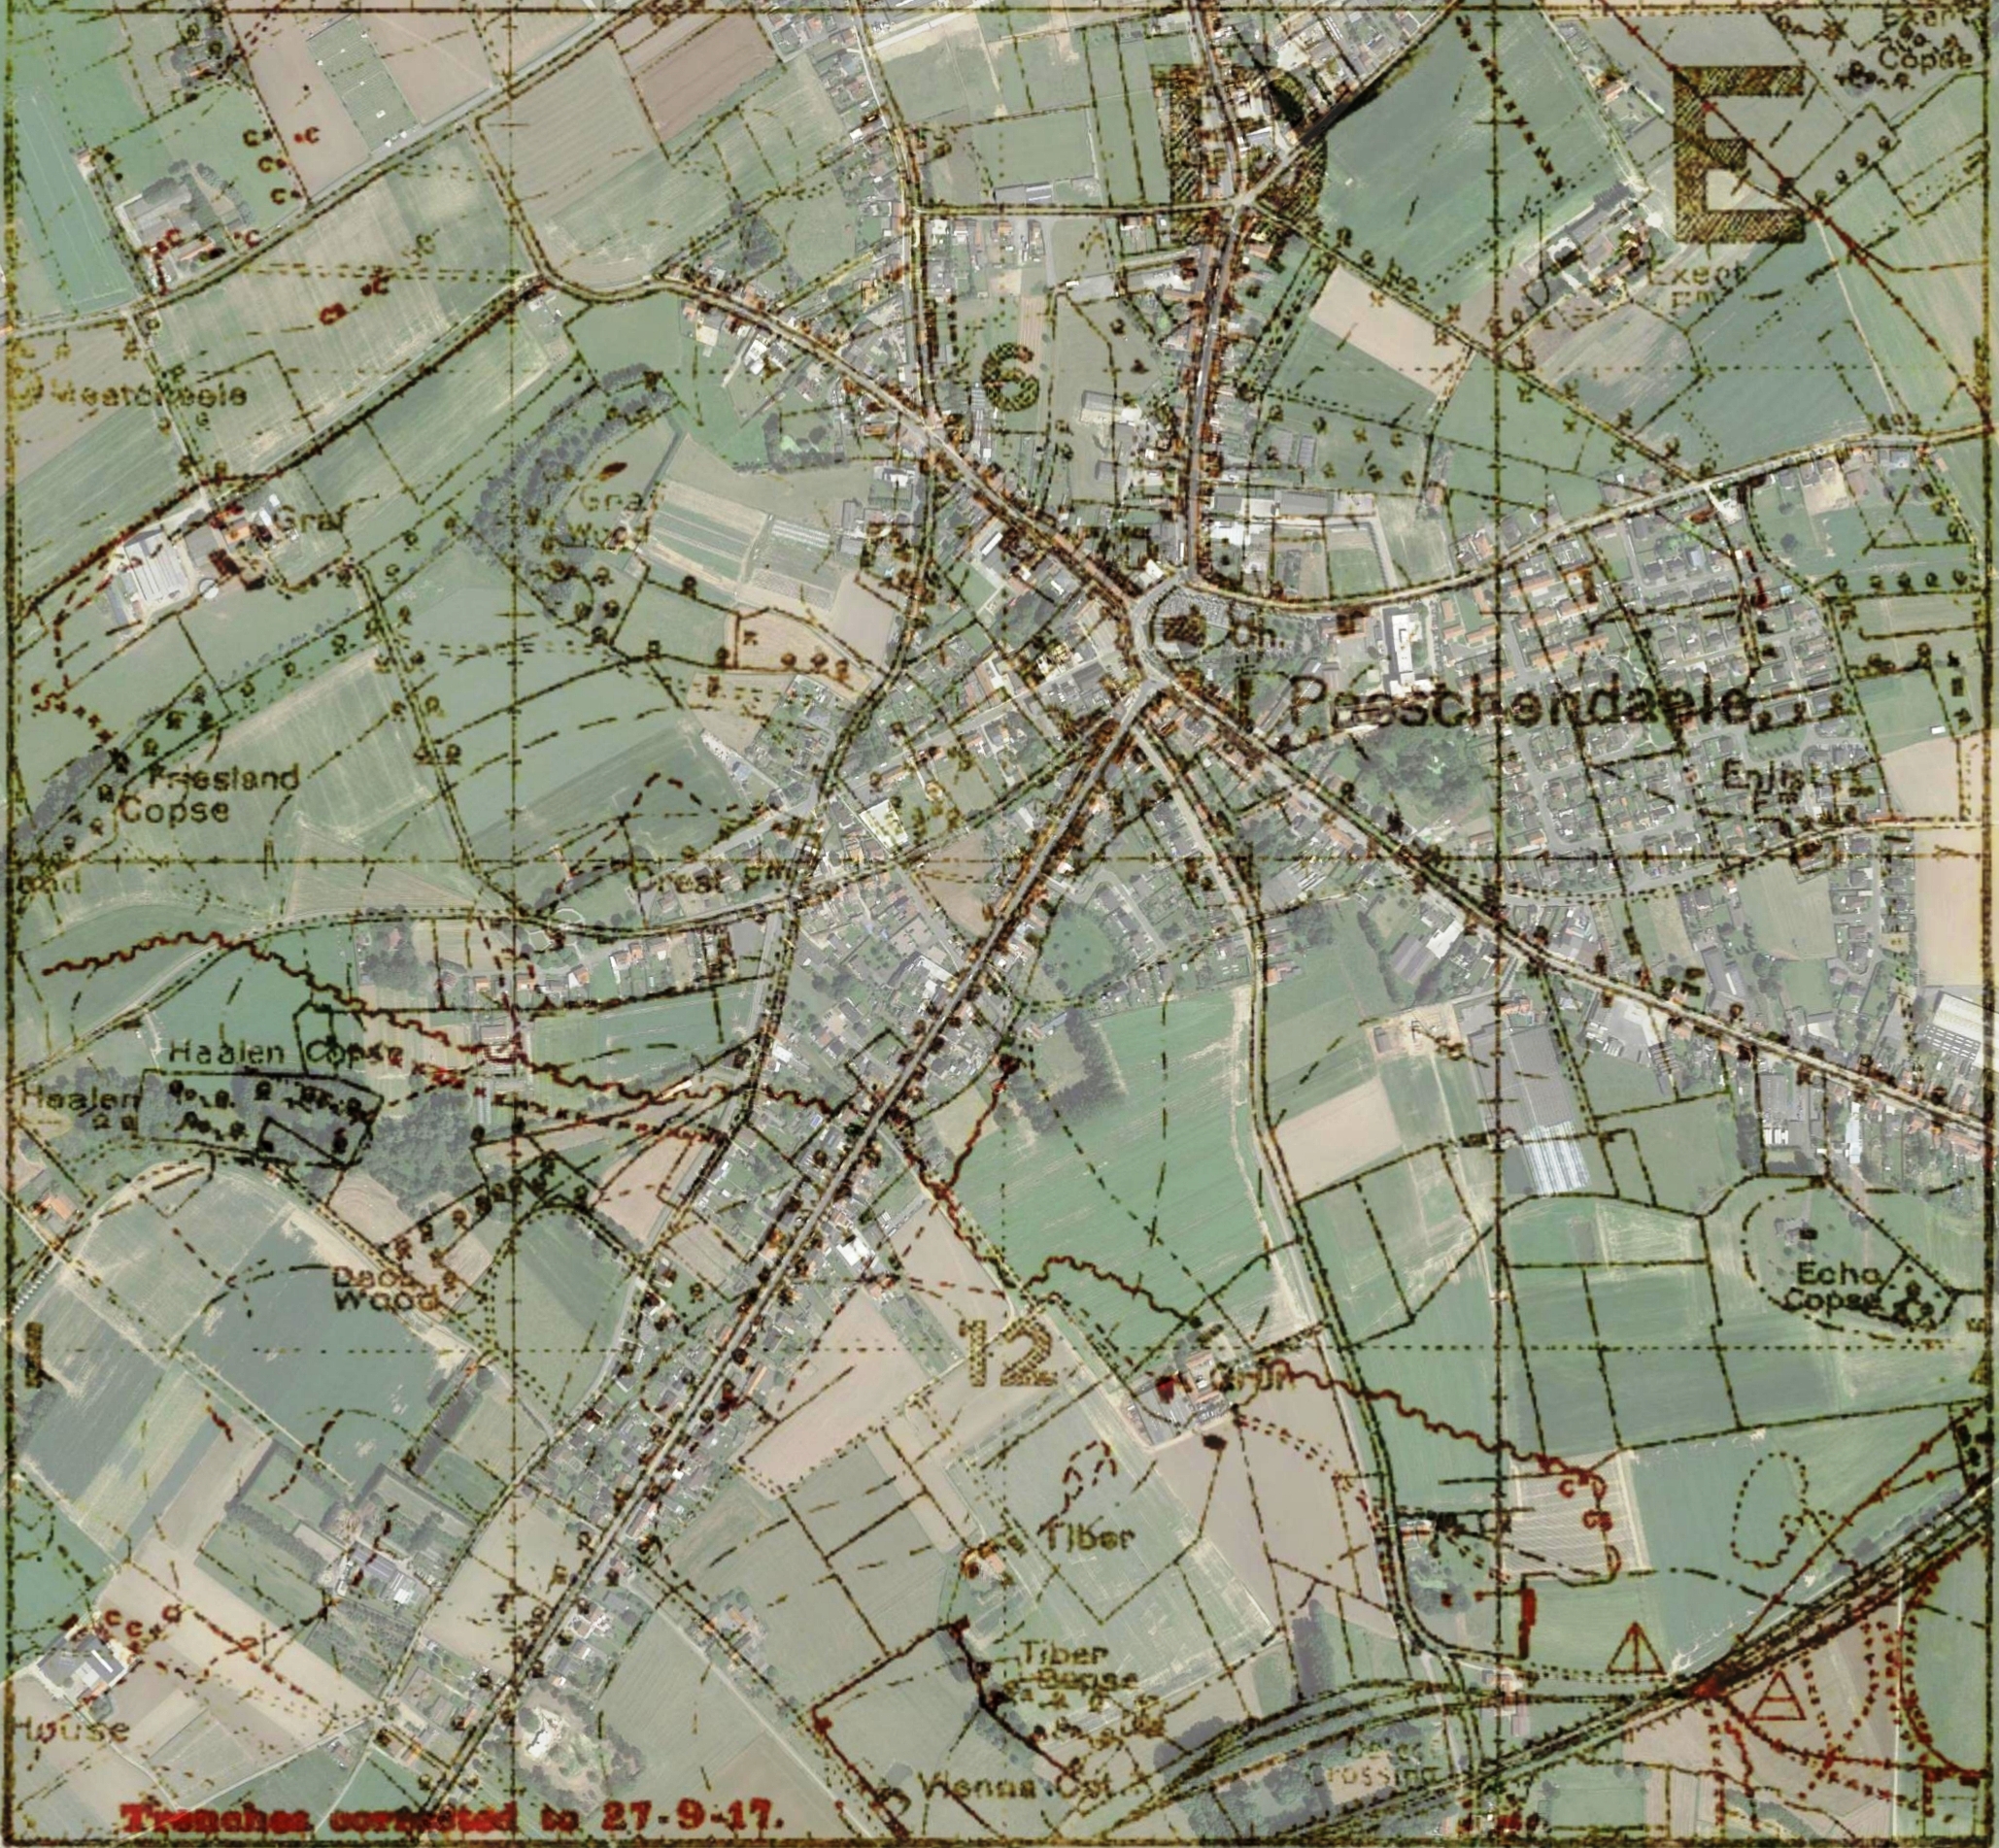
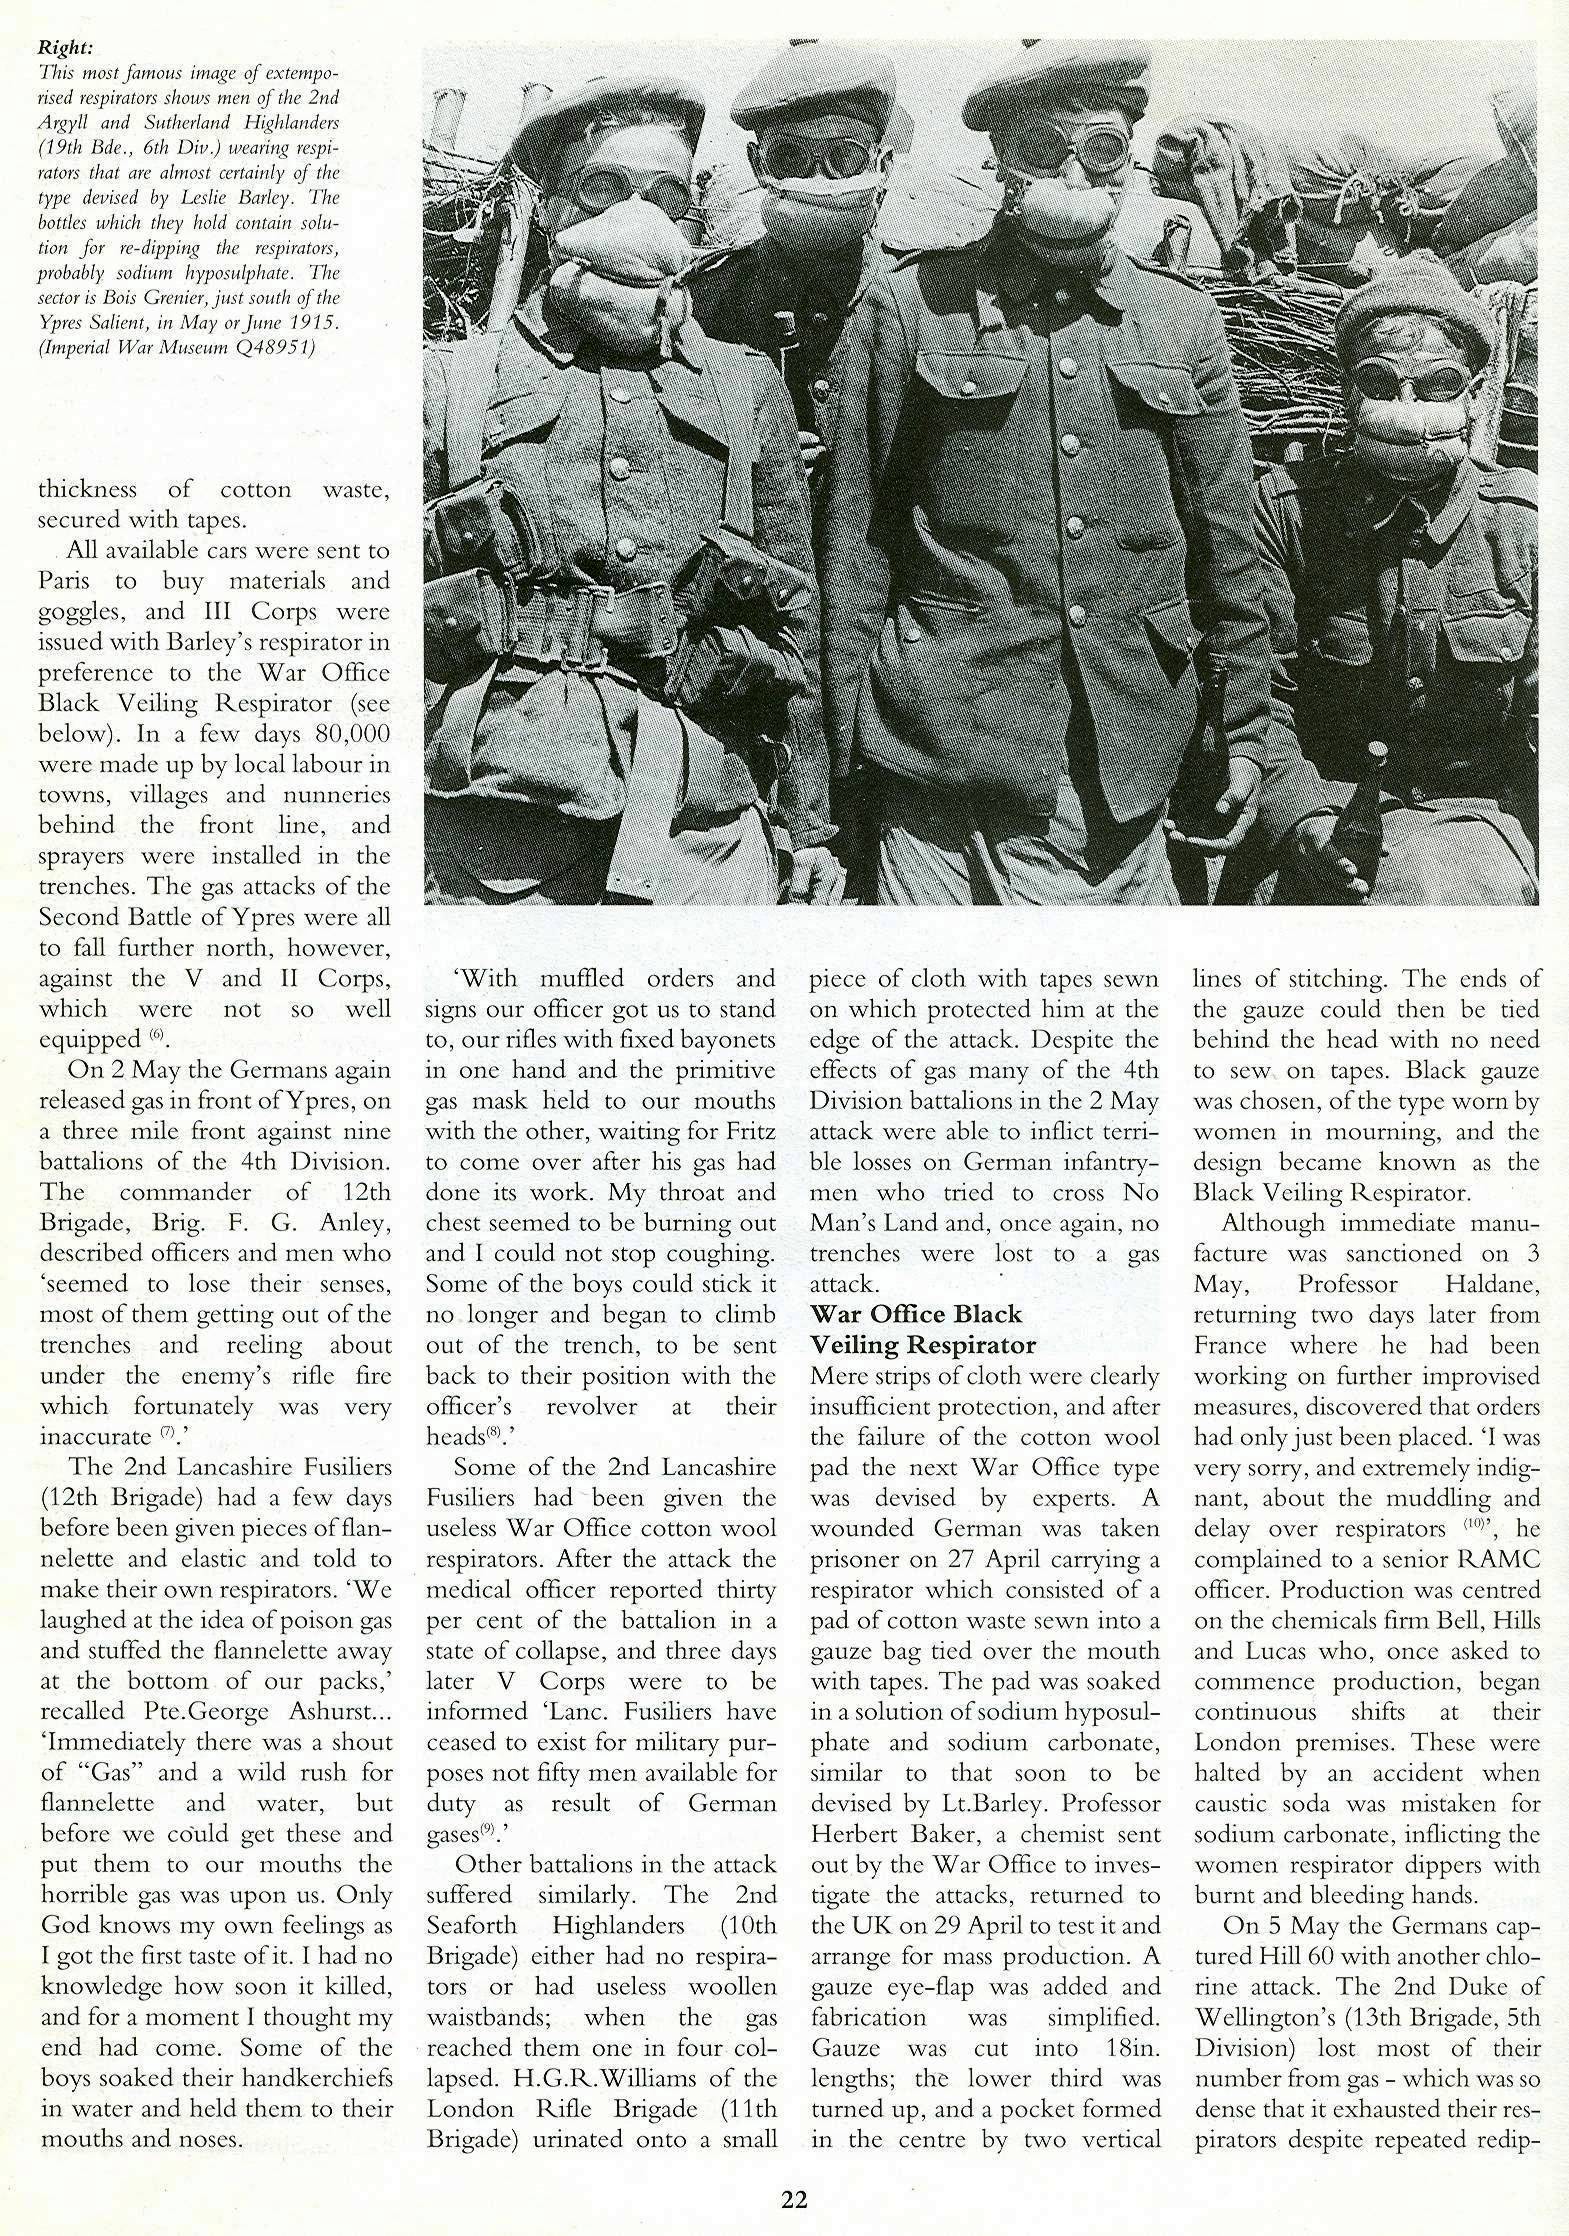
On 20th November 1917, a major British surprise attack with massed tanks made deep advances into the German positions south of Cambrai, only for  much of the ground to be lost to a German counterattack ten days later.  A month afterwards, on the southern part of the battlefield the Germans made a further limited attack against a vulnerable salient held by the Royal Naval Division called ‘Welsh Ridge’.[4]  Beginning on Christmas Day, the Germans preceded the attack with heavy shelling which became intense at 6.30am on 30th December.  Fifteen minutes later they attacked, the leading waves, dressed in white overalls, advancing over the snow in long lines in the morning mist. Equipped with flamethrowers, the attackers quickly gained a hold on the front positions in the north and centre.

The Artists Rifles, in reserve (part of the 190th Infantry Brigade of the Royal Naval Division) behind the northern part of the salient, were ordered up to the front line to make a counterattack, led by A and B Companies.  This immediate and hasty assault, in daylight and without artillery support, aimedat  ejecting the Germans before they had consolidated their gains and dislocating any further attempts to advance.

John Nash map Welsh Ridge SimonJonesHistorian

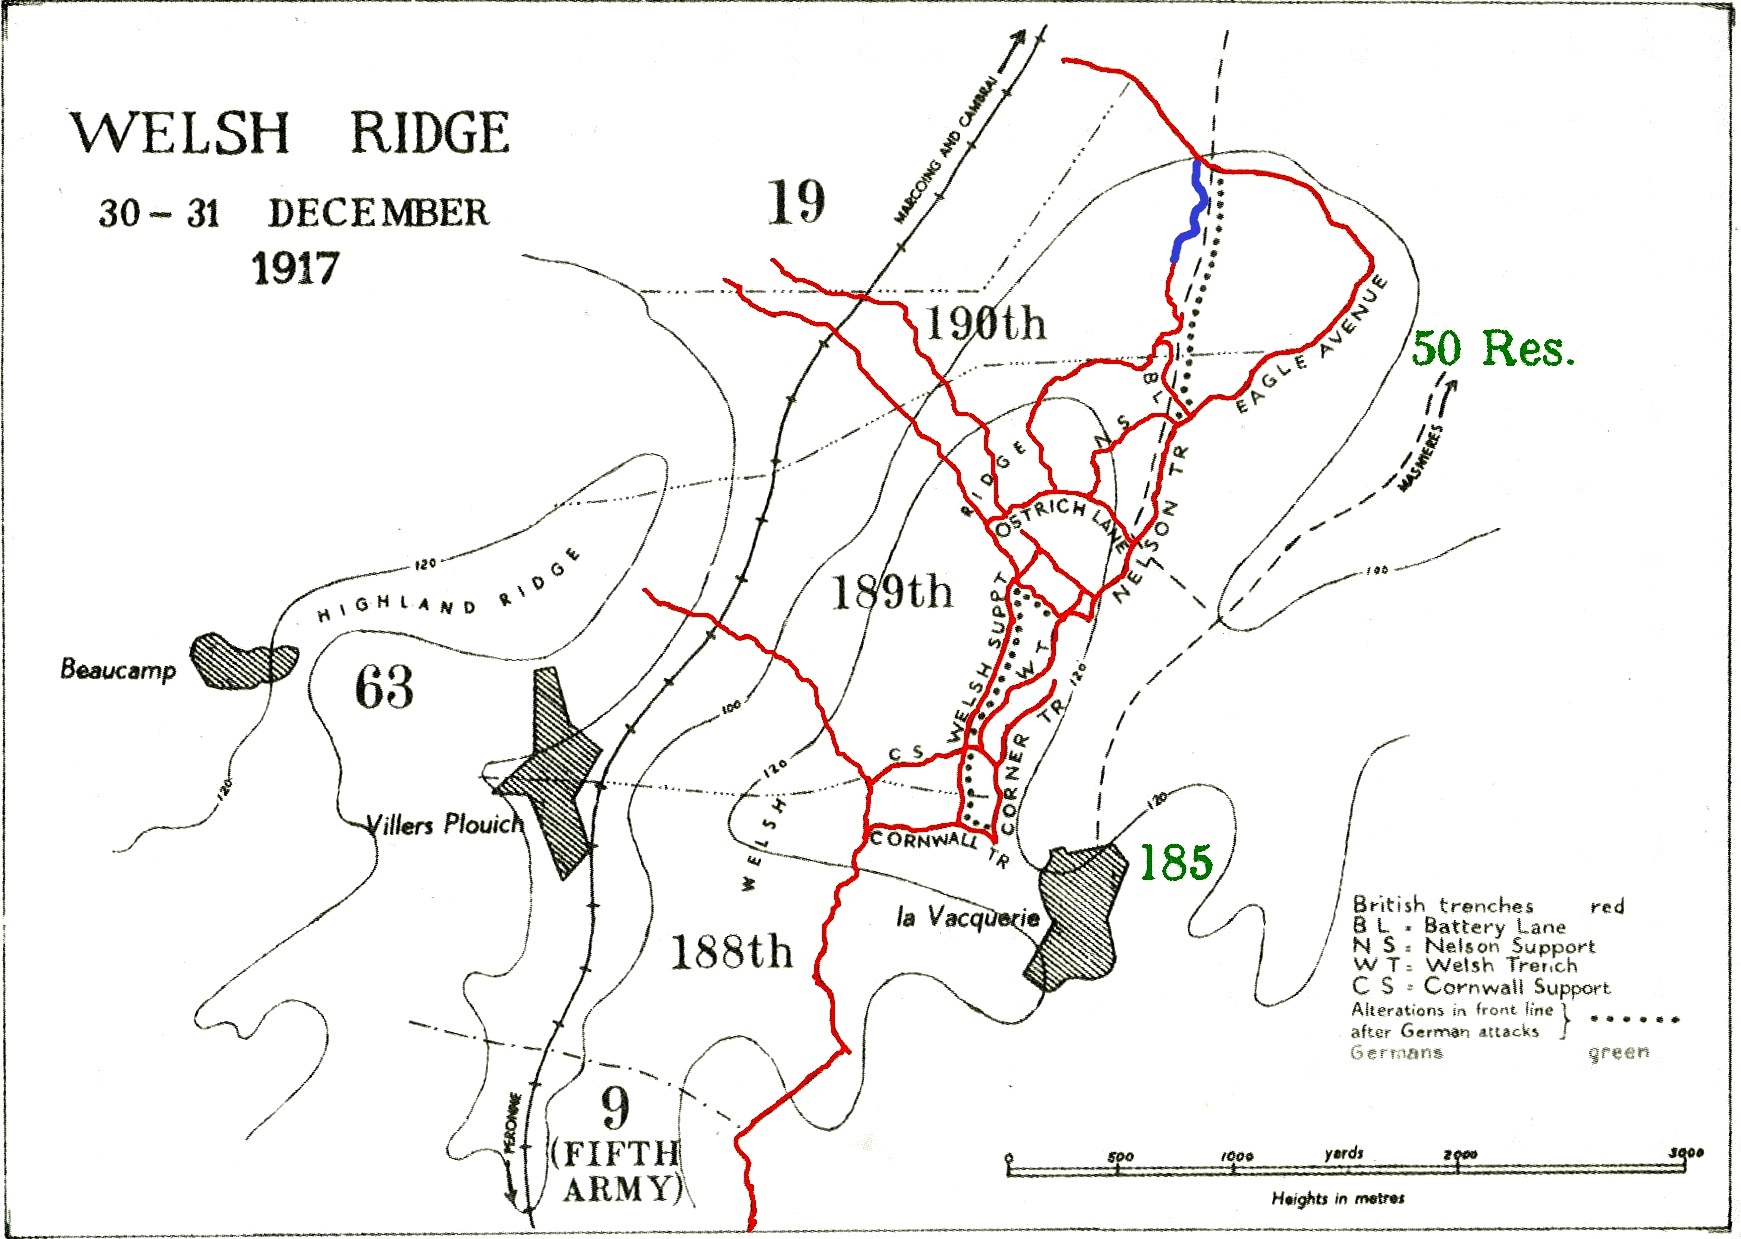
The Action at Welsh Ridge. The Artists’ Rifles attacked from the trench marked blue in a failed attempt to re-take Eagle Avenue. British-held trenches before the attack in red, dotted line shows the British front line at the end of the attack. German trenches not shown, German units in green. [Captain Wilfrid Miles, Military Operations France and Belgium 1917,vol. 3, (London, 1948)]

In ‘Over the Top’, British soldiers have just left a rough trench in which two men already lie dead, others fall after a few paces into no man’s land, the survivors plod fatalistically into no man’s land, their dark brown greatcoats contrasted with the white snow.  In his letter to Darracott, Nash explained why he depicted the attack:

It was in fact pure murder and I was lucky to escape untouched.  So you see I have very special memories as I was in charge of about fourteen men of the Bomber section… It was bitterly cold and we were easy targets against the snow and in daylight… I think the vivid memory of the occasion helped me when I painted the picture and provoked whatever intensity of feeling may be found in it… [5]

In an account of the attack published in the Artists’ Rifles Gazette in 1935, a sergeant of B Company, Reginald Lee, gave his reaction to Nash’s painting:

…the first time I saw it, …it immediately recalled in every detail the early morning scene at Welsh Ridge on December 30th 1917.[6]

Ordered to move forward to the make the attack ‘just before daybreak’, Lee described how the journey from the rear to the front line was rendered ‘very tedious and trying’ by the fatigue of the troops and the heavy German shelling.  By the time his Company reached the front line, it was already Zero hour, about 11.15am, and the exhausted men:

had to jump out ‘Over the Top’ immediately on arrival.  This is what you can actually see in Nash’s picture!  The snow and mist; men of ‘B’ Company characterized by the blue square on the upper arm of their greatcoats; the sergeant with a Lewis Gun, already the sole survivor of his Lewis Gun section, and later a casualty himself.

John Nash Over the Top-Detail Sgt SimonJonesHistorian

Detail from ‘Over the Top’. A man falls hit, behind a Sergeant Lewis machine gunner, said by Reginald Lee to be the sole survivor of his section. The blue square indicated B Company of the Artists’ Rifles.  © IWM (Art.IWM ART 1656)

Lee was on the right of the attack, with a platoon of about fifteen men; after about thirty yards, they walked into heavy German machine gun fire which especially caught the men on his left.

Nash, also in B Company, was a corporal in command of a section of Bombers, men trained in the use of grenades. He was probably to the left of Lee and his account also describes the heavy fire as they tried to cross no man’s land:

There was not a shot for a while, suddenly the Germans opened up and that seemed to be every machine gun in Europe.

Lee edged to the right, away from the fire, after about fifty yards he could see the German barbed wire, 25 yards ahead, and beyond that:

somewhat distinctly through the mist – I could see the heads and shoulders of the German troops. They commenced to fire at us with their rifles, and before we could get down they had caused further casualties including my Nos. 1 and 2 Lewis Gunners. The remainder of my platoon, now only four men – two of whom were wounded – and myself, took cover in a shell hole. From this spot we were able to be of some use with our rifles, as we were able to make the Germans keep their heads down.

Study for 'Over The Top' Art.IWM ART 3907-SimonJonesHistorian

The larger of two studies by Nash for ‘Over the Top’, both include barbed wire on iron pickets which was omitted from the final painting. © IWM (Art.IWM ART 3907)

Lee believed that, to their left, some men of A Company managed to get into the German front line.  A private in A Company, Alfred Burrage, was not one of them:

We scrambled over somehow when the whistle went, and it was a relief if anything to get out of that dreadful pelting of shells.  The air now was stung with all the queer and variegated sounds of bullets.  In the middle distance we saw the heads of our enemies, and a German officer standing up as large as life directing fire.[7]

Burrage took cover in a sunken lane in no man’s land with a handful of others:

I crouched where I was for what seemed hours, not daring to show my head and suffering agonies of terror lest the Boche should walk over and murder what remained of us.

Eventually  the survivors received orders to retire.  To Burrage’s right, Nash, Lee and a few others of B Company, remained in the shell holes until it was dark when they were able to withdraw.  Nash recalled:

We never got to grips with the enemy but were stopped in sight of them.  We had to ‘hole up’ in craters and shell holes till nightfall and then got back to our original line.

The Brigade Major recorded in the War Diary that ‘the attack was doomed before it commenced’, owing to the ground being so well commanded by the Germans who were already firmly established in their captured trench.[8]  The War Diary of the Artists’ Rifles recorded the casualties for the 30th – 31st December as about nine officers and 108 men.[9]  Lee’s recollection was that, of 80 officers and men of B Company who had answered the roll that morning, just two sergeants and ten men returned.  In an angry memoir published in 1930, entitled War is War, Burrage summed up the attack:

Of course we hadn’t a chance. We were the small cards in a game of bluff.  The handful of us – A and B Companies – were tossed at the enemy as a tacit way of saying: “We can counter-attack, you see.  We’ve got plenty of men.  Don’t you dare come any further.”

Burrage described seeing John Nash among the survivors of B Company, ‘badly shaken and blackened all over with explosive’.  He comments that shortly afterwards Nash went on leave and never returned as he obtained employment as an official War Artist.

John Nash Over the Top SimonJonesHistorian

John Nash, ‘Over The Top’. 1st Artists’ Rifles at Marcoing, 30th December 1917, © IWM (Art.IWM ART 1656)

Nash painted ‘Over the Top’ in June 1918 after he had been commissioned by the Ministry of Information, working alongside his brother Paul in a large shed in Chalfont St Peter in Buckinghamshire.  Here John also painted ‘Oppy Wood, 1917’, while Paul began one of his most famous war paintings ‘The Menin Road’.


Text © Simon Jones.  See below for Notes to this article.


Join me on a battlefield tour with The Cultural Experience:

Simon Jones Battlefield Tour Somme Poets 2019

The War Poets: Words, Music and Landscapes, 10th-13th July 2023

First & Last Shots 1914 & 1918

Medics & Padres in the Great War

Walking Ypres 1914-1918

Walking the Somme, Summer 2023

More Information about Battlefield Tours


Vincent Faupier19698175Res

Who was Ivor Gurney’s ‘The Silent One’? The night attack by the 2/5th Glosters on 6-7 April 1917


Notes.

[1] Sir John Rothenstein, John Nash, (London, 1983), p. 51.

[2] Recorded conversation with J. C. Darracott [and D. Brown], 1974, Imperial War Museum Cat. 323. http://www.iwm.org.uk/collections/item/object/80000322

[3] Recorded conversation with J. C. Darracott, op. cit.  Letter 15 January 1974 to Joseph Darracott, Keeper, Art and Design History, Imperial War Museum, quoted in Rothenstein, op. cit., p. 48.

[4] The 63rd (Royal Naval) Division was an infantry division formed in 1914, originally comprising many Royal Navy Reservists.

[5] Letter 15 January 1974 op. cit.

[6] Account by ‘R.A.L.’ (Reginald Alfred Lee), Artists’ Rifles Gazette, January 1935, p. 5, quoted and identified as Lee by Rothenstein, op. cit., and Patrick Baty, ‘Over the Top’, http://patrickbaty.co.uk/2017/12/16/over-the-top/ (accessed 30/12/2017).

[7] ‘Ex-Private X’ [A. M. Barrage], War is War, (London, 2010, originally published 1930), pp. 185-190.

[8] Captain C. H. Dowden, 190 Brigade War Diary, UK National Archives, WO95/3117.

[9] 1/28th (Artists Rifles) London Regiment War Diary, UK National Archives, WO95/3119.

[10] Letter 15 January 1974 op. cit.

URLs for IWM online catalogue:

‘Over the Top’ Art.IWM ART 1656

Sketch for ‘Over the Top’ Art.IWM ART 3907

Sketch for ‘Over the Top’ Art.IWM ART 3908

URL for NPG photograph x127172
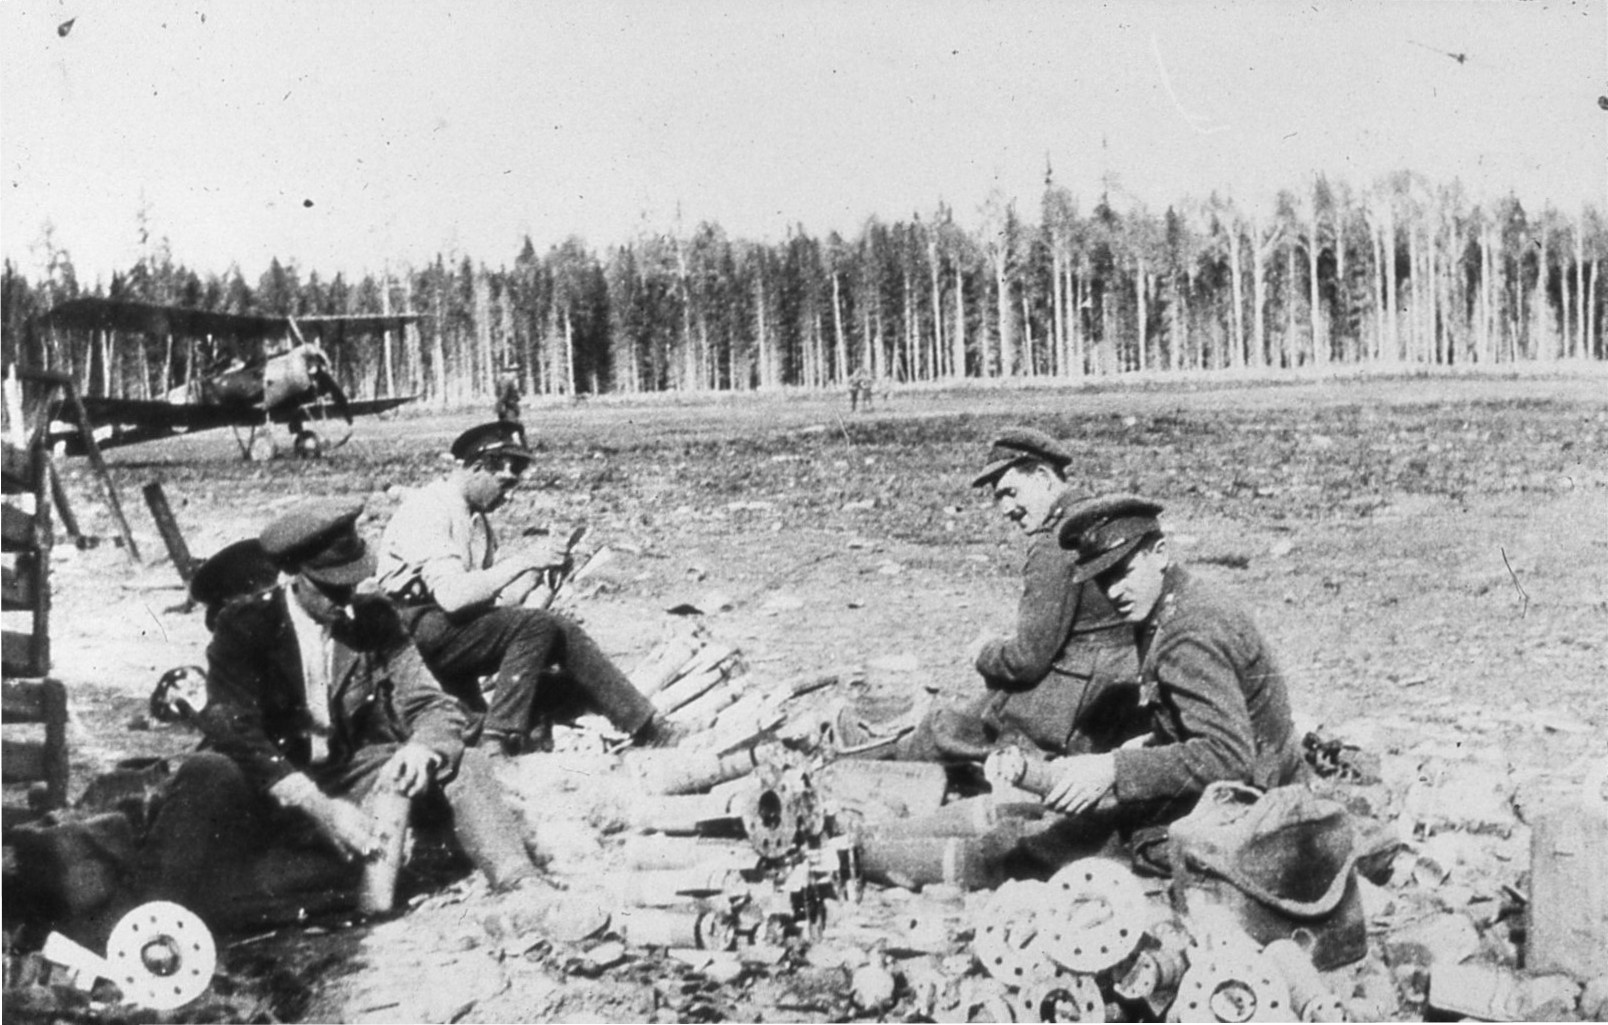

The Gas Attack at Caporetto, 24th October 1917

The Battle of Caporetto (12th Battle of the Isonzo) was a German – Austro-Hungarian attack against the Italian positions on the Upper Isonzo (Soča) river. It was named after the town today known in Slovenian as Kobarid.

GE advances from PPTcr

The attackers achieved a break-in by twin advances along the valley floor to bypass the Italian front line defences. In the ensuing break-through and retreat, the Italians lost 14,000 square kilometres of territory, making the gas attack the most successful ever staged.

Celo Mt Svinjak Bovec valley P1000976

The Bovec valley from Austrian positions at Čelo (Simon Jones).

The Austro-Hungarian artillery used large numbers of gas shells to penetrate Italian artillery batteries in tunnelled mountainside emplacements. In addition, on the northern valley floor, the Germans used a new type of gas weapon to break the Italian front line positions at Bovec (Plezzo in Italian, Flitsch in German). A ravine immediately behind the Italian front, inaccessible to field artillery, was targeted with gas in the first German use of a weapon copied from the British.

P1000510

The German 18cm Projector showing how it was partly sunk into the ground, with projectile, seen in Kobarid Museum.

26 Gas min Caporetto

The German 18cm gas smooth-bore mortar bomb, an existing design employed with the gas projector. (From S.S. 420 Notes on German Shells, second edition, General Headquarters, 1918.)

Developed during the Somme, the British Livens projector was crude but highly effective, hurling cylinders of liquid gas from hundreds of steel tubes sunk into the ground. Its devastating effect persuaded the Germans to adopt a version of the weapon, the 18cm Gas Projector, with its first use at Caporetto.

Q 48449 German projectors Feb 1918

18cm Projectors laid out before being dug in, these photographs, apparently taken on the Western Front, show the same configuration as used on 24th October 1917. (IWM Q 48449).

After transportation difficulties on the narrow mountain roads, on 23rd October 1917 912 projectors were dug in about 130 metres behind the Austrian lines by the 35th Pioneer Battalion, a specialist gas warfare unit.[1]

Q 88120 German projectors

German gas pioneers installing firing charges in 18cm Projectors. (IWM Q 88120)

Q 29949

Installing the electrical cabling for the simultaneous firing of the 18cm Projectors. (IWM Q 29949)

The entrances to the gorge were targeted, with the bulk aimed at the gorge itself. Gas projectors were ideal for this position, which could only be reached by high trajectory weapons, and where the gas would form a dense concentration and penetrate many dugouts situated in the gorge. This use of the weapon mirrored one of the earliest uses of the Livens projector during the Battle of the Somme when the British fired gas into Y Ravine prior to the assault on Beaumont Hamel on 13th November 1916.

Seesselberg-419

The shoot plan for the projectors installed between Bovec to the north and the Soča (Isonzo) river to the south. From Friedrich Seesselberg, Der Stellungskrieg 1914-1918, (E S Mittler and Son, Berlin, 1926), p. 419.

The artillery gas bombardment began at 2am on 24th and the projectors were fired electrically five minutes later. The simultaneous discharge was accompanied by a sheet of flame and a loud explosion. In flight, the bombs emitted a trail of sparks and made a loud whirring noise, before bursting with a sharp detonation, producing a thick white cloud.[2]

Of the total installed, 894 could be made ready for firing, and 818 bombs hurtled into the gorge filling it with about 6.5 tonnes of phosgene gas.[3] Twenty-nine projector barrels burst and seven pioneers were affected by gas; 47 failed charges were fired 35 minutes later. The pioneers then attempted to re-lay the projectors and reload them with explosive bombs, but owing to the gas and barrel bursts, they were only able to fire 269, between 6.30am and 8.30am.

GE Seesselberg overlay2Crop

The shoot plan on a modern satellite photograph, showing the ravine behind the Italian lines targeted. (Simon Jones/GoogleEarth)

The Austro-Hungarian infantry attack was launched north of Bovec at 9am, seven hours after the gas attack. The gassed area to the south was assaulted by 140 Storm Troops from the 35th Pioneers. They encountered no resistance, just some weak machine gun fire from the far side of the Soča river.

The Pioneers found the ravine clear of phosgene but the dense concentration of highly poisonous gas had done its work perfectly. Just a few isolated Italians remained alive but badly injured. The rest of the garrison, 600-800 men, were all found dead. Only some had managed to put on their masks, after the bombs had landed amongst them. The rest were in attitudes indicating sudden death.

The absence of any resistance on the left flank of the Austrian attack enabled the whole Bovec valley to be taken with remarkable rapidity. The Italians had failed to create an in-depth defence and, within a few hours, the break-in developed into a break-through.

P1000908

A small cavern in the ravine in which the gas victims were caught is now a monument. (Simon Jones)

P1000901cr

P1000906

P1000903crop


References.

[1] This account is drawn from Rudolf Hanslian, Der Chemische Krieg, (E S Mittler & Sohn, Berlin, 1937), pp. 178-182. Hanslian cites as his sources Friedrich Seesselberg, Der Stellungskrieg 1914-1918, (E S Mittler and Son, Berlin, 1926) and W. Heydendorff, ‘Der Gaswerferangriff bei Flitsch am 24. Oktober 1917’ in Militärwissenschaftliche Mitteilungen, 65. Jahrgang, 1934.

[2] S.S. 420 Notes on German Shells (Second edition), General Headquarters, 1918, p. 454.

[3] Hanslian, p. 178 states that the projectiles for the 18cm Projector contained 12-15 litres of liquid gas but the British manual, S.S. 420 Notes on German Shells, second edition, (General Headquarters, 1918), reported from examination of the 18cm projectile that it contained 5.23 litres.


Join me on a battlefield tour with The Cultural Experience:

Simon Jones Battlefield Tour Somme Poets 2019

The War Poets: Words, Music and Landscapes, 10th-13th July 2023

First & Last Shots 1914 & 1918

Medics & Padres in the Great War

Walking Ypres 1914-1918

Walking the Somme, Summer 2023

More Information about Battlefield Tours


Slovenia P1000723

Trenches and Memorials on the Italian Front around Caporetto – 1


e4 105mm mustard

Yellow Cross: the advent of Mustard Gas in 1917


sawyer-spence

Understanding Chemical Warfare in the First World War


Myths of Messines

For the centenary of the Battle of Messines of 7-14 June 1917 I have written four blogs examining often-repeated misconceptions about the battle.

Times 08061917 LG claims to hear Messines minesCrop

The Big Bang Heard in Downing Street:’ How far away were the mines heard and felt?


Hausler miner 9June1917

Did the Messines Mines Really Kill 10,000 Germans?


7694acropEnhdeSat

Killed by their own mine? Were the soldiers in Spanbroekmolen Cemetery killed by the falling debris of the mine?


H15258

The Lost Mines: how many unexploded mines remain beneath the Messines ridge battlefield?


Join me on a battlefield tour with The Cultural Experience:

Aerial photo WW1 mine explosion craters Messines

Tunnellers on the Western Front: The Underground War, 15th-18th September 2023

Simon Jones Battlefield Tour Somme Poets 2019

The War Poets: Words, Music and Landscapes, 10th-13th July 2023

First & Last Shots 1914 & 1918

Medics & Padres in the Great War

Walking Ypres 1914-1918

Walking the Somme, Summer 2023

More Information about Battlefield Tours


Underground Warfare

Buy a signed copy of Underground Warfare 1914-1918 at a reduced price.

Myths of Messines: Killed by their own mine?

There is an often-repeated claim that many of the British soldiers buried in a cemetery on the Messines Ridge battlefield were killed by the falling debris of their own mine, 150 yards away at Spanbroekmolen.  What is the truth behind this claim?

Lone Tree Cem CWGC

Lone Tree Cemetery, Belgium, where many of the British soldiers are said to have been killed by the British mine at nearby Spanbroekmolen. (© Commonwealth War Graves Commission)

The signal for the advance at the Battle of Messines was the detonation of nineteen mines, to be fired at Zero Hour at 3.10am on 7th June 1917. The decision to fire them exactly at Zero, rather than to allow time for the debris to fall, resulted from a disastrous error made at the opening of the Battle of the Somme on 1st July 1916, when one of the mines was fired ten minutes in advance and served to warn the German defenders in the entire sector of the imminent attack.

7694acropEnhdeSat

The three Kruisstraat mine craters with the Spanbroekmolen crater to the north.

To fire the mines exactly at Zero was a risk. Although efforts were made to synchronise exactly the detonation of the Messines mines, in the event there was a delay of up to 30 seconds between the explosions. The first wave of attackers advancing to the Spanbroekmolen mine was comprised of men from the 14th Royal Irish Rifles but there are no eyewitness accounts from this unit to confirm that they suffered any loss from the mine. The after-action report by the battalion commander records confusion caused by the slight variation in the times of detonation. When a mine detonated, the men got up to attack from where they were lying ready in no man’s land but, as they advanced, another exploded in front of them, throwing them off their feet and causing them to lose direction in the dust and darkness.[1]

43849_2511_1-00231-Report cropMid

Part of the report by Lt.-Col. G. R. H. Cheape, Commanding 14th Battalion, Royal Irish Rifles, 12/6/1917. (TNA WO95/2511)

The detonation of the Spanbroekmolen mine was also witnessed by an officer of the Tunnelling Companies, Major Ralph Stokes, who was at the tunnel entrance about 570 yards away. He recorded that the  Peckham mine, 500 yards to the northeast, detonated 20 seconds before Spanbroekmolen.[2]  It seems therefore that the Peckham mine detonation caused the 14th Royal Irish to stand up and begin to advance only to be caught by the shock wave of the Spanbroekmolen. The absence of a reference to casualties from the Spanbroekmolen mine in the CO’s report does not mean that none occurred among the 14th Royal Irish.

36 Div Deployment

The attack by the 36th (Ulster) Division at Messines on 7th June 1917. The first and second waves are shown alongside one another whereas the 14th Royal Irish Rifles led the 10th Royal Inniskilling Fusiliers attacking at Spanbroekmolen and the 8th Royal Irish Rifles led the 15th attacking Kruisstraat, where three mines were blown. (Detail from a map in the Harington Papers, King’s Regiment Collection, National Museums Liverpool)

However, the origin of the story of the Spanbroekmolen casualties may be traced to an account of the attack in a widely-read book published in 1978, They Called It Passchendaele, in which mines at Kruisstraat, 650 yards to the southeast, were confused with  the Spanbroekmolen mine. The author, Lyn MacDonald, quoted from an account by Lieutenant T. Witherow, 8th Battalion, Royal Irish Rifles, describing how his battalion also advanced prematurely (perhaps again owing to the Peckham mine firing before the others) and the death of a Lance-Corporal by falling mine debris:

We’d made it through the machine-gun fire and had almost got to the German positions, when a terrible thing happened that nearly put an end to my fighting days. All of a sudden the earth seemed to open and belch forth a great mass of flame. There was a deafening noise and the whole thing went up in the air, a huge mass of earth and stone. We were all thrown violently to the ground and debris began to rain down on us. Luckily only soft earth fell on me, but the Lance-Corporal, one of my best Section Commanders, was killed by a brick. It struck him square on the head as he lay at my side. A few more seconds and we would have gone up with the mine.[3]

Witherow’s 8th Royal Irish at Kruisstraat was separated by another battalion from the 14th Royal Irish Rifles attacking at Spanbroekmolen. Stokes recorded that a group of three mines at Kruisstraat went off two seconds after the Spanbroekmolen mine (i.e. 22 seconds after the Peckham mine). [4]  References in the text of They Called It Passchendaele indicate that Lyn MacDonald appeared unaware that Witherow’s battalion was far closer to the mines at Kruisstraat than to that at Spanbroekmolen.[5] A footnote in the book to Witherow’s account compounds the error:

Many of the Irishmen, both Southerners and Northerners, who were killed by the fall-out from the Spanbroekmolen mine lie where they fell in tiny Lone Tree cemetery, just down the hill from the Spanbroekmolen mine crater.[6]

Men of the 8th Royal Irish were indeed buried in Lone Tree Cemetery, even though they were killed some distance to the south, and it is quite possible that Witherow’s Lance-Corporal was buried there. No men from Northern Ireland, that is from the 36th (Ulster) Division, were killed by the Spanbroekmolen mine, the closest attackers being a third of a mile to the north.  Unless further eyewitness accounts come to light, there is no evidence that more than one British soldier was killed by the debris falling at Kruisstraat, and none that any were killed at Spanbroekmolen.

1024px-Lone_Tree_Crater_2009

The Spanbroekmolen crater, known today as the Lone Tree crater or Pool of Peace. (Wikimedia Commons)


See below for references & credits.


Join me on a battlefield tour with The Cultural Experience:

Aerial photo WW1 mine explosion craters Messines

Tunnellers on the Western Front: The Underground War, 15th-18th September 2023

Simon Jones Battlefield Tour Somme Poets 2019

The War Poets: Words, Music and Landscapes

First & Last Shots

Medics & Padres

Walking Ypres

Walking the Somme

Simon Jones Battlefield Tour bear gryllsMore Information about Battlefield Tours


Peckham-enh

Myths of Messines: Four Misconceptions about the 1917 Battle Re-examined


References:

[1] War Diary, 14th Battalion, Royal Irish Rifles, TNA WO95/2511.

[2] Maj. R. S. G. Stokes RE Visits Diary, 7-8/8/1917, TNA WO158/137.

[3] Lyn MacDonald, They Called It Passchendaele, (London 1978), pp. 46-7; the informant may be identified as Thomas Hastings Witherow (1890-1989). MacDonald does not give details of the source for the account but it may be a typescript memoir of which a copy is held in the Liddle Collection, University of Leeds https://library.leeds.ac.uk/special-collections-explore/30002/witherow_t_h.

[4] Maj. R. S. G. Stokes RE op. cit.

[5] MacDonald, op. cit., pp. 39-40, 46-7.

[6] MacDonald, op. cit., p. 47.

Credit: Lone Tree Cemetery from Commonwealth War Graves Commission.


Underground WarfareBuy a signed copy of Underground Warfare 1914-1918 


Times 08061917 LG claims to hear Messines minesCrop

Myths of Messines: ‘The Big Bang heard in Downing Street’


Hausler miner 9June1917Myths of Messines: Did the Messines Mines Really Kill 10,000 Germans?


H15258

Myths of Messines: The Lost Mines of Messines